Tag Archives: travel guide

24 Hours in Singapore

Eat, See and Do Singapore In 24 Hours

y intense, albeit short adventure to the global city of Singapore was everything one would imagine from the luxurious film set of “Crazy Rich Asians.”

Touching down into the “Lion City” awaited an exciting modern oasis balancing impressive futuristic architecture against the stunning tropical landscape. Its unique history and fusion of Malaysian, Indian, Chinese, Arab and English cultures echos everywhere you walk. Though the humidity might melt your face off, the vibrant street colours, glitzy multi-complexes and culturally rich enclaves are exciting exploring grounds to discover on foot.

This 24-hour itinerary will give you the best of the touristy essentials mixed with some local finds to entice you back for another visit. Oh, and satisfy your fatty foodie soul with the tastiest grub in town!

Start with a Local's Breakfast

Ya Kun Kaya Toast Family Café or Chee Kei in Changi Airport Terminal 2

efore leaving the airport, kick start the first of your many food adventures with a traditional Singapore breakfast staple at Ya Kun Kaya Toast.

Kaya toast is toasted bread filled with butter and a jam called, kaya. Kaya is made from eggs, sugar, coconut milk and pandan leaves. The dish is dipped in and eaten with a soft boiled egg and either hot coffee or tea is served together.

At first, the idea of a cold butter sandwich dipped in egg sounded quite bizarre and admittedly heart attack inducing but the combination is surprisingly delicious.

An alternative is a bowl of good old Cantonese comfort food – wonton noodle soup. At the famous Chee Kei noodle shop grab some noodles with a serving of radish or, if you have two stomachs, the Braised Beef Tendon and Brisket with Rice is not to be missed.

Above: Ya Kun Kaya Toast Family Café’s Set A – Kaya Butter Toast with a Soft Boiled Egg, Kaya Butter Toast and Coffee or Tea.

Right: Chee Kei’s Shrimp Noodle Soup, Braised Beef Tendon and Brisket with Rice and Radish (side dish).

See The Gardens by the Bay Early

ingapore has arguably the most well maintained public gardens I have ever been in any country. Rightly so, given its reputation and committed vision to being a “City in a Garden.”

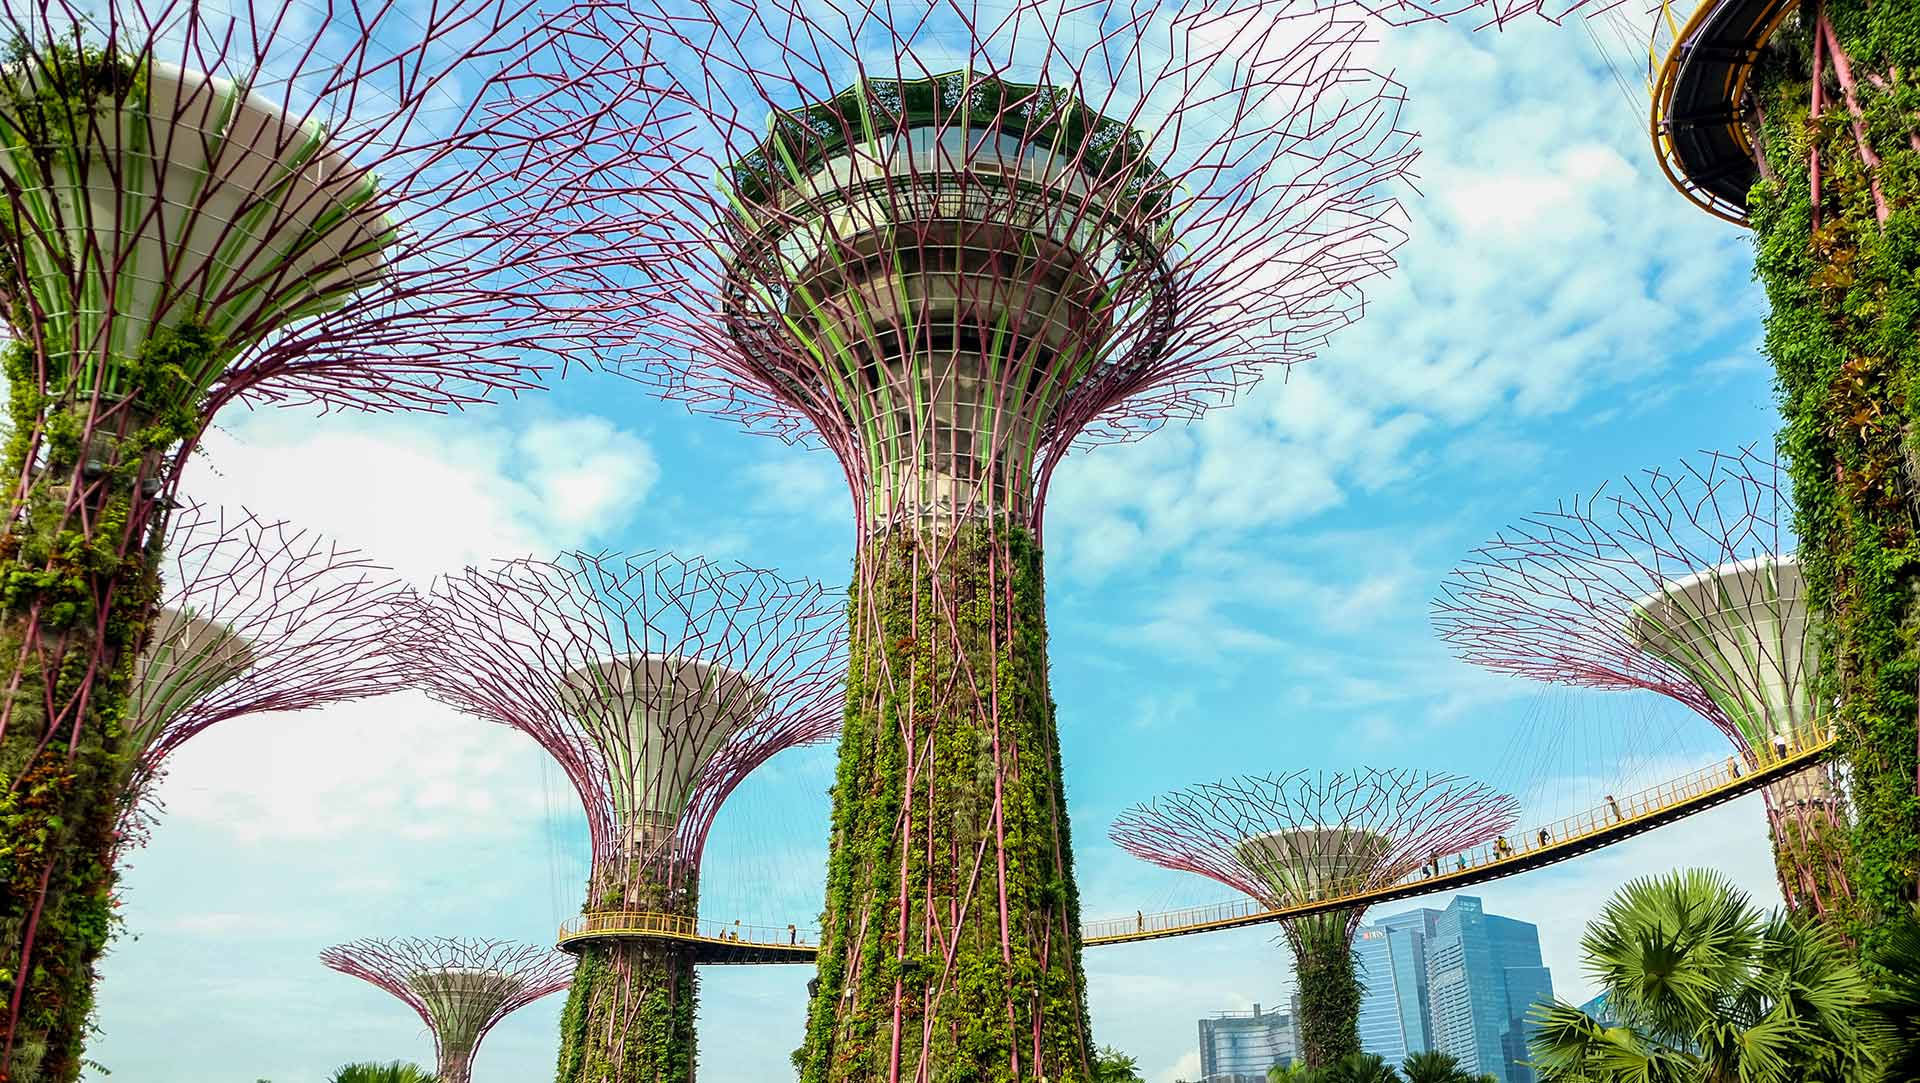
It is the site for the beautiful Supertree Grove that scenically towers over the surrounding botanical gardens and is a very popular tourist spot.

If you plan to walk along the OCBC Skybridge, I suggest getting there as early as possible to enjoy a somewhat uncrowded vantage point to overlook the beautiful botanical gardens below and local area.

Within the Gardens by the Bay are a number of other attractions with the two most popular being the Cloud Forest and Flower Dome.

Head to Brunch at CHIJMES

The Glasshouse Specialty Coffee and Toast Bar

Chijmes, 30 Victoria Street, #01-03 Singapore 187996

estled inside the gorgeous CHIJMES building, The Glasshouse brings us the delights of specialty coffee and artisan sourdough bread surrounded by giant leafy houseplants as if a greenhouse and coffee shop had merged.

Out of all their open sandwiches I tried, the Classic Salmon Sandwich was the winner with it’s salty salmon slices and tart pickled radish on herby cream cheese spread. The Hummus and Bread Bowl was worth it to try out their delicious homemade hummus but maybe their Avocado and Dukkah Sandwich would have been the better choice to change up the taste experience while eating.

For coffee, I chose the interesting White Coffee since it is a popular local coffee style plus I added oat milk just to be a little extra.

After brunch, it’s also worth exploring the CHIJMES building itself. It’s a beautiful reconverted old Catholic convent with open hallways and cloistered courtyards.

The beautiful Neo-Classical style makes it a showstopper for wedding photos and the gorgeous interiors of the other diners are perfect for Instagram-worthy outings.

Left: The Hummus and Bread Bowl and White Coffee.

Right: Classic Salmon Sandwich with Avocado Slices (Extra).

Browse and Window Shop at Haji Street

f you like eccentric art and a place that is bustling with activity both day and night, you will no doubt enjoy a stop over to this charismatic neighborhood.

Haji Street is a trendy joint full of independent shop houses and eateries. You can find an exciting mix of interesting hobby and fashion stores matched with tasty international food and quirky bars – all sandwiched next to each other in perfect harmony.

Experience Chinatown

istorically the area where Chinese immigrants settled during British ruled Singapore, the red and gold coloured streets of Chinatown is a vital cultural enclave for visitors to experience Chinese culture and heritage.

Though a longer stay would include a thorough visit to the famous Buddha Tooth Relic Temple and NUS Baba House, here is a sample of Chinatown’s famous eateries and sights.

Follow the Mural Art Trail

Dotted around various locations within small back alleys or between shopfronts on the main road, the street art created by Singapore’s creative artists will take your breath away with their depictions of the past to more modern inspirations.

The murals painted by artist Yip Yew Chong are my particular favourite for their detailed scenes of times gone by in old Chinatown. Try to pose just right for that perfect shot and turn those stills into living artwork. Check out here for street art locations.

Dine at the World’s Cheapest Michelin-starred Restaurant

Hawker Chan Chinatown Restaurant

78 Smith St, Singapore 058972

Hawker Chan Chinatown Complex Branch

335 #02-126 Smith St, Complex Market & Food Centre, Singapore 050335

Start your Michelin-starred studded food trek with a visit to the first Hawker to be awarded one star, Hawker Chan Soya Sauce Chicken Rice & Noodle.

For those unfamiliar with Cantonese food, soy sauce chicken is a popular dish in Hong Kong that requires meat to be braised and marinated multiple times while roasting in an oven or open fire. The result is a mouth watering caramelized outer layer with a juicy and moist inside that’s so tender you’ll wonder how it could only cost under SGD$4 at Hawker Chan.

If the original Hawker store is too crowded or you arrive later in the day (the stall closes at 3:30PM and Sundays), the restaurant version located a few steps away is a more comfortable alternative with air conditioning and longer operating hours. Though, this restaurant establishment version only received a Bib Gourmand award, the large tables and ample seating make this alternative worth visiting for a taste.

Soya Sauce Chicken Rice

Char Siew Noodle

Find the Best Cheap Grub at Maxwell Road

Maxwell Road Hawker Centre

1 Kadayanallur St, Singapore 069184

Hawker Centres are large food courts housing many individual food vendors dishing out no-frills meals with maximum flavour for dirt cheap.

Singapore’s Chinatown is abundant in hawker centres but the clear stand out the local’s swear by is Maxwell Road Hawker Centre.

Maxwell Road Hawker Centre has been featured on many television programs and is home to the nation’s most famous chicken rice hawker stall Tian Tian and their rival Ah Tai.

No visit to Singapore would be complete without a taste of Tian Tian’s Hainanese Chicken Rice.

Tian Tian has a high reputation within Singapore and around the world, having been awarded the Bib Gourmand award by The Michelin Guide, praised by Anthony Bourdain whose poster hangs proudly in their store and even winning against Gordon Ramsey in a culinary showdown on Singtel’s Hawker Heroes Challenge.

A few stalls down is another well-to-do establishment called Ah Tai Hainanese Chicken Rice. The owner, who also shares the same name, actually is a former staff of Tian Tian. From storefront design to food menu options Ah Tai shares some dare I say “similarities” to their famous neighbour’s chicken rice. However, one taste and you’ll soon realise that there’s something deeper going on in its flavour that makes it it’s own.

So, which is better?

It might sound like a cop-out but they are both so identical in quality it’s hard to tell. They are both really good. What is different is the slight taste experience happening in your mouth when tasting both.

I guess one can argue that it simply comes down to the dining experience. Ah Tai offers complimentary soup and a shorter wait while Tian Tian offers that yummy stock rice that just can’t be beaten.

If you are keen to know more I suggest visiting hungrygowhere for a deep dive into what you can expect from both places.

Ah Tai Hainanese Chicken Rice

Tian Tian Hainanese Chicken Rice.

Take a Tea Break

Tea Chapter

9 Neil Road, Singapore 088808

hile in Chinatown, a stop at the Tea Chapter is a must. It has an impressive reputation within Singapore and was even visited by Queen Elizabeth II!

The tea shop on street level is a great place for buying high-quality tea but climb the wooden stairs to reach the tea salon above you’ll find a fascinating place for some traditional refreshments.

Upon arrival, you can choose your favourite tea room setting before sitting down and glancing through their hand bond menus.

As to expect, there were many black, white, green and red teas on offer but we chose the recommended Queen’s tea called “Imperial Golden Cassia.” We also asked the staff for a tea serving demonstration before attempting the steps ourselves.

The experience at Tea Chapter was a great eye-opener to the appreciation of Chinese tea culture. It was one of the highlights of my trip! I loved the authentic and educational insight the staff provided while being able to relax and enjoy chatting with company.

“Imperial Golden Cassia” is the same tea Queen Elizabeth II was served on her visit here.

View the Night Scene with the Merlion

Marina Bay Area

here’s nothing quite like a romantic nightly stroll along the waterfront to soak up the city lights and at the Marina Bay area, there are three places that look amazing light up under the dark sky: the SuperTree Grove (again, haha), Marina Bay Sands and the Merlion.

If you are following this 24 hour guide in order, I would recommend to visit the SuperTree Grove first, than take the footbridge that connects to the Marina Bay Sands resort complex to see the nightly free SPECTRA – Light & Water Show at the Marina Bay Sands waterfront before walking along the harbour to see the Merlion on the other end.

This will make for shorter travel time to the next activity, eating chilli crab at JUMBO Seafood!

The SPECTRA – Light & Water Show at the Marina Bay Sands waterfront is at 8PM and 9PM on Sundays to Thursdays while on Fridays and Saturdays it will be changed to 9PM and 10PM.

There is also a light and sound show called Garden Rhapsody at the SuperTree Grove held at 7:45pm and 8:45pm daily.

The SuperTree Groves lit up during the night.

The Marina Bay Sands on the opposite side of the waterfront.

The Merlion lit up at night.

Dine on Singapore's Famous Crab

JUMBO Seafood Restaurant – Riverside Port

30 Merchant Road #01-01/02, Riverside Point, Singapore 058282

nother signature dish to try in Singapore before leaving is, of course, the infamous chilli crab.

Singaporean chilli crab is so good it was listed 35 on the World’s 50 most delicious foods list by CNN Go. Its a deliciously cooked crab in a sweet-savoury tomato chilli based sauce.

If I could recommend a place, JUMBO Seafood is a great chain restaurant and the Riverside Point location makes for a modern and stylish dining experience. Although chilli crab isn’t supposed to a spicy dish despite its name, the spice level at JUMBO Seafood seems to have been made spicier when I visited in October this year (2019).

I would confirm with the waiter if they can make the sauce milder if you are not the best with spicy food.

They also offer packets of their special chilli crab sauce for sale should you want to buy one as a souvenir.

As it is one of their most popular locations, I suggest booking in advance if you are lusting to get your mud crab fix without waiting forever in line.

Singapore Chilli Crab

Ginger and Spring Onion Crab

See the Jewel

f time permits before flying out of Singapore, a stop at the newly opened Jewel is another must-do.

Jewel located in Terminal 1 is a nature-themed entertainment area in Changi Airport where you can see the world’s tallest indoor waterfall, Rain Vortex and enjoy recreational activities on the higher levels of the canopy garden.

Even if you are only able to enjoy the Rain Vortex’s light show, it’s a great way to close off your trip.

HSBC RAIN VORTEX

  • Open daily: 9AM to 11:30PM
  • Light & Sound Showtimes: 7:30PM – 11:30PM daily, at hourly intervals

Visiting Sendai’s Zao Fox Village

Visiting Sendai’s Zao Fox Village

have never experienced traveling to the north region of Japan before, that is until I found out about a magical wonderland dedicated to foxes among the peaceful green forest overlooking the peaceful countryside in the Miyagi prefecture.

On my first venture to the Tohoku area, I commemorated my visit with a mandatory stopover at the famed Zao Fox Village – an outdoor zoo where you can see cute red and white fox fluff balls up close and personal!

There is no denying that Japan has some of the most unique experiences to enjoy the company of adorable animals with plenty of animal cafes and animal islands to fill this deprived writer’s existence and the Fox Village is the most exotic in my opinion.

Located high up in the mountains of Shiroishi, Miyagi, here’s how I enjoyed my time with these mischievous furry friends.

FEATURES OF ZAO FOX VILLAGE

The Open Enclosure

fter entering the main area of the fox village, you are immediately greeted by curious foxes interested in your presence.

It was a pleasant shock to be able to get so close to these usually wild creatures and the enclosure space is large and wide enough that the foxes are free to run and walk around you. As foxes are nocturnal by nature, not all of them are the active type. Most seem to enjoy being tucked up in their tails and napping among the many tree stumps and burrows.

Though there is a paved pathway to make it easier to navigate, you can also walk freely on the unpaved nature areas where the piles of winter white snow provided a

lovely sight in contrast with their fiery red or jet black fur.

Being able to walk freely alongside these animals with little to no staff supervision was an added perk of the experience but it is also important to note their curiosity can get the better of them. The foxes are known to tug on bags for food or even pee on guests’ legs!

Before entering, the staff will give you a behaviour briefing with tips to make you feel more at ease. Also, the fox village does not allow visitors to touch the foxes in the open enclosure and you will need to pay to be able to touch and hold one which might be a bummer to know for some.

The Feeding station

n order to feed the foxes, you must purchase a small food bag at the register before entering the enclosure and only feed the foxes once inside the Feeding Station.

Getting inside the Feeding Station wasn’t quite as simple as I thought. These foxes were so darn smart they tried to be sneaky and enter the Feeding Station after me where they weren’t allowed! When opening the doors, make sure you look around you and move quickly as once the foxes see you about to enter, they will approach you understanding you are about to give them food. It took me a few tries to avoid their attention but I managed to “Mission Impossible” myself by walking backwards using my body as a “shield” to slither through the gap I created. Phew!

When you look over the edge, you’ll see the little critters amass towards the side eagerly awaiting a treat. Simply throw the feed towards them and watch them eat it below.


View this post on Instagram


A post shared by Supassara. (@supassra_sp) on

The Inari Shrine at the Top

arked by a trail of red torii gates at the north of the enclosure was a shrine dedicated to foxes.

At first I thought this was a lovely feature to have at the zoo but after looking around I slowly found it to be unimpressive.

Along the trail of torii gates, a majority of them looked a bit shabby with the paint extensively peeled off to expose the wood underneath hinting to the fact that they


View this post on Instagram


A post shared by 👶🏻 (@nzmskmton) on

haven’t been maintained in a while. The shrine itself was also very basic – a small hut surrounded by a fence in the signature red vermilion colour.

In all fairness, I assume this was done intentionally as anything fancier would be ruined by the curious foxes but I felt it could have been enhanced to be educational. A few more signs dedicated to a more historical look at foxes in Japan perhaps would be more pleasant to see rather than the numerous warning signs you’ll find around the enclosure and something I would be keen to know more about.


View this post on Instagram


A post shared by ᴀᴍᴀɴᴅᴀ ᴄʜᴀɴ (@kireiida) on

It seems recently they put new information about “Inari Shrines”

since my visit but only in Japanese.


View this post on Instagram


A post shared by 𝚖 𝚒 𝚗 ☃︎ (@umin__fuji) on

Example of how worn down the gates can be.


View this post on Instagram


A post shared by ypt film (@ypt.photography) on

It seems recently they have upgraded more torii gates since my visit.

The Petting Zoo

nother feature of the fox village is the petting zoo area filled with small farm animals like guinea pigs, goats, Patagonian Maras (a small type of Capybara) and, you guessed it, more foxes. The petting zoo area is also where you can experience holding and touching a fox for a small fee. Springtime is cub season so you can expect to see many cute baby foxes

being born and they also offer a “hug a baby fox” experience too.

As farm animals seemed a little lackluster compared to the foxes, I skipped them to look at the foxes in the caged area located just ahead. This section acts like a hospital of sorts and is used to house the juvenile young foxes, the sick, injured or currently breeding foxes. You can also find the exotic arctic fox here if you are lucky.


View this post on Instagram


A post shared by A+ (@roundfinger) on


View this post on Instagram


A post shared by Tamara Manesh (@tam_tam_tut) on

ADMISSION FEE AND GENERAL INFORMATION

Here’s a price list of all the fees for general admission and experiences (as of 2019):

GENERAL ENTRY

FOX FEED

FOX HOLDING EXPERIENCE

Here is some helpful general information for Zao Fox Village.

TIPS TO KNOW

s the saying goes: “You never know until it happens to you.”

Visiting Zao Fox Village was my first experience of Japan’s interesting animal haven spots and traveling through a new part of rural Japan was a welcome breath of fresh air away from the hustle of busy Tokyo life.

Though I am still new at traveling domestically here within Japan, there is always something to be learnt and I hope I can share with you some helpful tips and tricks to better prepare you on your journey.

Here are some helpful notes when preparing for your visit to Zao Fox Village:

Ethics

here are a few articles online that comment on the unethical nature of the foxes living at Zao Fox Village which I wanted to explore here. Unfortunately, there are no official details in English or Japanese about why the Zao Fox Village was started online that I could find at least. However, there are facts that the staff do explain during your briefing and some kind bloggers who were able to translate.

All foxes in the village are domestically bred and tamed. As they are all vaccinated, there is no fear of Echinococcus infection from being spread which allows a safe interaction between humans and animals.

One of the main problems I believe is the assumptions that can be stemmed from the misinterpretation of the word “sanctuary.” The original foxes at Zao Fox Village were actually rescued from the fur trade and they don’t sell any of the animals born in their care which makes it sound like an animal sanctuary of sorts. But, like a wonderland attraction, I would not call it an “animal sanctuary” in the sense of endangered species conservation. To me, it’s a themed zoo selling the image of a “fox heaven” experience.

Another issue was the animals kept in cages. There are a number of reasons explained as to why an animal had to be put in a cage. This could be due to sickness and preventing cross infection, being overly aggressive and needing to be isolated from the others or people, or during the breeding season. Regardless, animals kept in cages is an ethical dilemma that will always face heavy criticism. Unfortunately, in many Asian countries including Japan, views on pet and animal ownership can be very polarising especially from a Western perspective.

For me, the animals did seem fine in their cages and did not seem to be in distress or crying. That being said though, I do think the cages look shabby and would like to see them change its layout and structure.

Also, I think they should not leash the animals especially the farm goats. I speculate they did this in fear they would jump their pen and risk heading into an area they shouldn’t be in. I would rather see them make a more secure space for the farm animals or exclude them for safety reasons as an ideal situation.

Some people are concerned about the fox feed that the staff provides for the feeding station thinking it’s too similar to a cat or dog food. Foxes are well adapted to human environments and they also can enjoy eating pet food as written here.

I try to keep an open mind and I do believe that the staff are doing their best to take care of all their animals. The animals all seem happy, well looked after and healthy though, I do think there should be improvements to the cages and more information on processes for transparency and education.

My two cents is this, if you hate zoos or animal enclosure environments, I highly suggest you do not visit Zao Fox Village. If you love animals, are looking to have a unique experience with them in an open free space and have an open mind, then I do recommend going to Zao Fox Village for the experience.


View this post on Instagram


A post shared by Kristina Smith (@lilkatze) on

How to get to Zao Fox Village From Tokyo
Arriving By Train:

The easiest way to get to Zao Fox Village from Tokyo is via bullet train (shinkansen). With the bullet train at Tokyo station or Ueno station, take the JR Tohoku bullet train called Yamabiko – やまびこ Sendai all the way to Shiroishi-Zao station. Be careful as there is another stop also called Shiroishi station which is further away.

Getting to Zao Fox Village from Shiroishi-Zao station:

After arriving at Shiroishi-Zao station, you will need to take a bus or a taxi to get to the Zao Fox Village. I highly recommend the taxi as it is the most convenient method.

For going to Zao Fox Village, there should be taxis waiting outside the station but the tourist information center can call one for you. When going back to the station, the staff at the Fox Village can call a taxi for you.

Using the bus to get to Zao Fox Village from Shiroishi-Zao station is the cheapest way but incredibly limiting.

The local Castle Kun bus runs on Tuesdays and Fridays from Shiroishi Station to Kawarago Dam, at 7:58am and 1:35pm. You must ask the driver to let you off at Zao Fox Village, as it is not a regular stop and also confirm the time and where to wait for the return bus to pick you up. To be honest with all this hassle, it’s not worth it but if you do decide to take this route, it is probably best to take the first bus and take a taxi back.

Arriving By Bus:

A cheaper method is to take a highway bus to Sendai however you will still need to catch a local train to Shiroishi Station.

Arriving By CAR:

If you have a Japanese or the international driver license you can rent a car and enjoy the freedom of traveling at your own pace.

Day Trip: Visiting Mont Saint Michel From Paris

Day Trip: Paris to Mont Saint Michel

ne of the most breathtaking sights in France is seeing the island of Mont Saint Michel floating off Normandy’s coastline.   While it may look like a castle floating on water from afar, Mont Saint Michel is actually home to a medieval village and abbey, and was once one of Europe’s most popular pilgrimage destinations.  Considered as one of the most important sites of medieval Christian civilisation, Mont Saint Michel was listed as a UNESCO World Heritage site in 1979.

For me, the most fascinating thing about Mont Saint Michel is its location as a tidal island.  I absolutely loved the idea of a place that could only be accessed via a treacherous journey during low tide, as if it were some kind of mysterious and secret place.  Turns out it’s not as romanticised as that nowadays, because a modern causeway has been built that connects Mont Saint Michel to the continent, making it easily accessible regardless of the tide,  and a much safer journey.

You might be thinking “how dangerous could crossing the mudflats to Mont Saint Michel be anyways?” The answer is VERY DANGEROUS. In fact, Mont Saint Michel’s tides were (and still are) considered so dangerous, that the place was nicknamed by medieval pilgrims as “St Michel, peril of the sea.”  The tide is said to travel at extremely fast speeds with waves as high as 14 metres.  And if you thought the tide was all you had to worry about, the mudflats also act like quicksand in areas and could swallow you alive. With the journey being considered so difficult,  medieval pilgrims saw it a test of penitence, sacrifice and commitment to God.

View of Mont Saint Michel from the Dam

Things to See and Do

Take Photos by the Dam

Mont Saint Michel

ondering where I took this photo? It was at Mont Saint Michel’s dam.  In fact, the dam’s design is so pretty, that I didn’t even realise it was a dam!  Situated close to the carpark, the dam was my first pitstop on my walk to Mont Saint Michel.  I was surprised at how quiet the dam was at midday!  Perhaps most people had flocked to the Mont by this time, bu there was only a small group of 15 people sitting here and having lunch.  On the opposite side of the dam, I could access a small area of grassland which had absolutely no one in shot! So I set up my tripod on the dam and took some shots with my remote.

You might be wondering, why does Mont Saint Michel have a dam?  Well, it’s to regulate its water flow.  Over time, human and tourist developments significantly impacted the landscape around Mont Saint Michel.

The tourist development that caused the most problems was the old causeway – a large road built on ground that connected the island to the continent.  At this time, the visitor carpark was situated at the base of the Mont.  The old causeway interfered with the flow of water and caused sediment to build up around the island.  If nothing was done, the sea around the island would cease to exist and vegetation growth would be surrounding the island within 40 years!  In 2009, a new dam was built to regulate the water from the Couesnon river, giving it enough force to push the sediment back out to sea. The carpark was removed from the base of Mont Saint Michel and moved back to the continent where a shuttle bus service helps takes tourist to and from Mont Saint Michel.  Finally in 2015, the new and elegant walkway bridge was complete.  Suspended from the ground, the bridge allows water and sediment to flow through without causing sediment buildup.

Find out how Mont Saint Michel’s Dam works here.

Mont Saint Michel

Mont Saint Michel Walkway Bridge

Shot from the new walkway bridge

Explore the Medieval Streets

When you arrive at Mont Saint Michel, the first thing to do is to explore the medieval streets.  Go everywhere. You’re allowed to explore all the nooks and crannies so I encourage you to!  I’ve read online that many people compare the streets of Mont Saint Michel to a real life Diagon Alley and I guess it’s the closest comparison I can think of too.

When you arrive at Mont Saint Michel, you’ll cross a medieval drawbridge – still fortified with its portcullis – to reach Grand Rue, the main street of the village.  The street is narrow and cobblestoned with charming medieval buildings lining either side. I was so hoping for the stores that occupied these buildings to have kept a slice of tradition, much like you still see in the little towns across France like Èze or Annecy

with their artisanal boutiques and food.  But I was really disappointed – most stores comprised of gimmicky souvenir shops, modern clothing stores, modern takeaways and restaurants (some kept their traditional charm though).

Looking up from street view, gorgeous steel signs are suspended from the entrance of buildings and the crowds really do help create the illusion of bustling medieval streets.  Veering to the left side, I started climbing some of the steps past the small chapel, and entered the Logis Tiphaine Museum which had a great view over the Grand Rue.  Looking down from here, I was really able to take in the street, architecture and flora as a whole and it was really beautiful.   Exploration is really the key to finding beautiful little surprises around the village.

Mont Saint Michel Draw Bridge

Medieval Streets of Mont Saint Michel

Medieval Streets of Mont Saint Michel

Signs hanging from the buildings

Mont Saint Michel Grand Rue

Mont Saint Michel Streets

Mont Saint Michel Streets

Mont Saint Michel Streets

View of Grand Rue from Logis Tiphaine Museum.

Visit The Museums

s you’re strolling through the medieval streets of Mont Saint Michel, it’s likely you’ll come across some museums.  If you’re into the historic significance behind the places you’re travelling to, Mont Saint Michel’s Abbey and 4 museums work together to paint a complete picture of Mont Saint Michel’s 1000 year history.

The museums are quite small and you can get them done in around 20 minutes.  If you’re interested in seeing all 4 museums, you can get a combined ticket for 18 euros and save a bit of money (otherwise each ticket is 9 Euro).  See more on museum pricing.  Find out more information on each museum below:

The Archéoscope

This museum is not really a museum, but a multimedia sound and light show that aims to tell the history and legends of Mont Saint Michel in a unique way.  Involving a 3D model, video, light and holographic projections, the show aims to completely immerse the viewer, but falls short according to Trip Advisor reviews. Visitors claim the Archéoscope was a waste of money primarily because it was so out-dated and only narrated in French.  If you don’t speak French, you won’t get a lot of value out of the show.  I personally decided to skip this museum.

THE HISTORICAL MUSEUM

The Historical Museum dedicates itself to Mont Saint Michel’s 1000 years of history and covers information about the monks who built the Abbey and the Mont Saint Michel prisons.  It houses a collection of ancient weapons, art, torture instruments from the Middle Ages, the iron cage of Louis XI and the oubliettes (dungeons). Similar to the Archéoscope, tourists have not been impressed with this museum for similar reasons: outdated wax figures, the “dungeons” were not real and made from fabricated plywood and almost everything was in French.

Museum of the sea and ecology

This museum deep dives into Mont Saint Michel’s environment – the tides and the bay’s flora and fauna.  The museum comprises of models of wartime ships, commerce, fishing and boating.  There’s also a video that explains the tidal phenomenon, the islands silting problems and restoration work.

Again, this museum has pretty bad reviews online, as all videos and signage are in French only.

The Logis Tiphaine Museum / Maison de Bertrand du Guesclin

Out of the four museums, I had time to visit one and I’m so glad I instinctively chose the best one!  Although the reviews are also, not great for this museum, the ratings are better and I happened to really enjoy it!  Again, most of the signage and information in here is in French, but this museum had access to English translation via a smartphone app (this was limited though compared to what’s available in French, but I still enjoyed it).

This museum is the historical house of Knight Bertrand du Guesclin, which he built for his wife Tiphaine to keep her safe during the wars.  Bertrand was constable of the armies of the King of France (14th Century) and one of France’s best known Knights.  His wife Tiphaine de Reguenel, was a famous astrologer and sorceress known for reading the stars and people’s futures.  Inside, you’ll walk through various rooms of the house and a small garden and see period furniture, a bridal suite, tapestries and paintings, Bertrand’s armour, Tiphaine’s astrology cabinet and…a MIDDLE AGES CHASTITY BELT??  I was actually super intrigued by this and found it fascinating…why did she have one? Weren’t they married?  Was Bertrand somewhat controlling/abusive? Did she actually wear it?  Is it even real?

This museum is small, but I was actually happy for this bite-sized piece of history since I had limited time in the area. It wasn’t crowded so I could view everything at leisure.  Overall, I do recommend a visit – you can see my pictures below!

Logis Tiphaine Museum

Logis Tiphaine Museum

Logis Tiphaine Museum

Logis Tiphaine Museum - Chastity Belt

Eat A Traditional Omelette

part from the amazing abbey, one of the other things Mont Saint Michel is famous for are its omelettes!  The best are said to come from the famous La Mere Poulard and her traditional recipe from 1888.  Today, the restaurant is immensely popular and was completely booked the day I went (much to my dismay) however there was smaller La Mere Poulard takeaway shop just opposite selling only omelettes (at least there was when I went there though I can’t find any evidence of this online, so I’m assuming it’s new!).  The omelettes are world famous due to the number of famous personalities that have dined at the restaurant and you can watch them being made from the restaurant’s main window.  The chef’s beat the batter to a unique and catchy beat and I wonder if this is part of the secret?  La Mere Poulard’s omelettes are then souffléd over high heat making them extremely fluffy.

If omelette’s are not your thing, other traditional dishes you can enjoy include Crêpes, meadow salted lamb, Normandy apple tarte and Normandy style mussels (which I dined on mmmmm):

Normandy Mussels


View this post on Instagram


A post shared by Vids That Get You Hungry!🍟🍰🍔🍩🍕 (@hungryvids) on

Take a Tour of the Abbey

Mont Saint Michel - Inside the Abbey

Mont Saint Michel Cloister

If you want to see medieval architecture at its finest, then look no further than the Mont Saint Michel Abbey – the highlight of a trip to Mont Saint Michel.  Being shaped like a pyramid, you can just imagine the challenges faced during its construction – and remember they didn’t have our technology back in the day either!  The abbey required creativity in design and extremely precise technical calculations by medieval builders.

The abbey church was built on the top of crypts, strong enough to take the weight of an 80m high church!  The layout of the abbey itself is influenced by the principles of monastic life, prayer and work, and the rooms were arranged around these activities.  The abbey is topped with a golden statue of Archangel Michael.

To see the abbey, you can opt for an audio guide for 3 Euro, but I would recommend taking the free tour (available in English and French year round and for a few other languages in peak season) to get the most out of the experience.  It takes about 1 hour and 15minutes and you’ll explore 20 different rooms.  If you’d rather be a lone soldier, there’s also a free pamphlet in various languages that guides you through the different sections of the abbey.

My favourite part of the abbey was the gorgeous views from the top viewing platform.

In summer, a light and sound display in the abbey grounds last from around 7pm to 10:30 pm. Visitors, who entered before 6 pm may linger for free, otherwise you will need to purchase separate tickets for the event.

Mont Saint Michel

Outside view of the abbey

Mont Saint Michel - Traversée

Mont Saint Michel Abbey

Mont Saint Michel Souvenir Shop

The gift shop also had some interesting Manga souvenirs!

Walk Across the Bay

Mont Saint Michel - Traversée

View of the Traversée from the Abbey

rom the ground, the bay might look like a sandy uninteresting pile, but from from the sky it looks so beautiful – it was a pleasant surprise!

If you feel like getting dirty, you can walk on the traversée just like the early day pilgrims.  It is strongly recommended you venture onto the traversée with a certified guide and not by yourself – if fact I’ve posted a sign with all the possible dangers below haha.

Most notably is the quickness in which the tide can come in and the pits of quicksand that a scattered throughout.  If you do a tour, the guides will point out what the quicksand looks like too.

The best way to find a guide is to prebook a tour – I’ve got some links at the end of this post, or to enquire at Mont Saint Michel’s tourist office (though it can be busy so things can book out fast!)

You can find information on the tides here and here.

View of Traversée Mont Saint Michel

Seagulls nesting at Mont Saint Michel

Paris to Mont Saint Michel Via Public Transport

e prepared, it’s going to be a long journey.  Mont Saint Michel is located about 4 hours from Paris and when taking public transport, you know that’s going to take longer.  The closest train station to Mont Saint Michel is Pontorson and you can get there from the following train lines:

The direct shuttle bus from Pontorson station to Mont Saint Michel and stops at a few stops along the way.  Getting off just before Mont Saint Michel (See point 4 “Route du Mont” bus stop on the map below) will stop you right near the dam and the shopping village where you can find restaurants.

While this is the typical journey, it is not the journey I took because I went for the cheapest option at the time that was suggested to me by my Trainline App.  From Paris Point De Neuilly, I caught the OuiBus.  It was a 5 hour ride, but very enjoyable and comfortable especially because it was direct – no changing stations etc. We arrived at 12:10PM, which is peak hour when it comes to crowds, and were dropped off in the coach parking lot (P7 on map below).  It was a short work to the tourist centre, dam and the Passeur shuttle service connecting Mont Saint Michel to the continent.  OuiBus is not always available and I believe only runs from Paris to Mont Saint Michel during peak season.

I found out a couple of days before that my OuiBus for the way back to Paris was cancelled and replaced with a solution via train, which was a bit more involved as a journey.  From Mont Saint Michel, I caught the public bus to Villedieu-les-Poêles train station, then a train to Paris Montparnasse 3 Vaugirard.  I was a little confused at first as to which public bus to catch and where the bus stop was, but the tourist centre was very helpful.

A loooong day, but definitely doable and there was plenty of time to do everything.

Arriving By Car:

Arriving by car is definitely the most convenient way to travel to Mont Saint Michel, though will cost a bit extra as you will need to pay for parking.  For more details and costs, click on the links below:

Route: Paris to Mont Saint Michel by Car

Prices for Parking at Mont Saint Michel

How to Get to Mont Saint Michel from the car park.

The Mont Saint Michel carpark is located on the continent and is about a 35 minute walk to Mont Saint Michel.  The good news is there is a free shuttle bus (The Passeur) that runs from the car park (see departure point 2 on the map) to Mont Saint Michel and takes about 10mins.

Alternatively, you can also take a traditional Maringote, used as transport by the pilgrims to venture across the bridge.  This is a paid service that costs 6 Euro and takes roughly 25 mins.

24 Hours in Pamukkale – Travel Guide

Welcome to Pamukkale

Ever wanted to visit a cotton castle? Well according to Turkish legends, the giants of Pamukkale would leave their cotton harvest outside to dry and it solidified forming a gigantic cotton castle that you can visit today.

And while I’m one for legends, Pamukkale is actually an incredibly rare geological phenomenon being one of only two petrified waterfalls that exist on planet Earth!

In fact, this geological wonder fascinates tourists so much that it often overshadows another amazing part of this historical site – the ancient Greek city of Hierapolis.  Built on top of Pamukkale, this town was founded in 2nd Century BC and is said to be home to Cleopatra’s thermal pool of choice, which you can still swim in.

So if you haven’t already, it’s time to add Pamukkale to your travel bucket list, and here’s my guide on how to easily visit it all in just 24 hours.


Getting to Pamukkale

Plane

The best and no fuss way to travel to Pamukkale is by plane.  The flight only takes one hour, airport to hotel transfer is super easy and it’s incredibly cheap with a one way ticket only costing $68AUD.  I flew one way to Denizli Cardak Airport from Istanbul Sabiha Gokcen Airport with Turkish Airlines.

There’s not a lot of info online about shuttle transfer from Denizli Airport to Pamukkale – but you don’t need to worry.  The Airport’s shuttle company BayTur is easily found right outside the airport exit and times align with Turkish Airline and Anadolu Jet arrivals.  Make sure you don’t take your time exiting the airport, if you miss the bus you will have to wait until the next flight arrival is scheduled to catch the next one.  This could be 2hrs+ of waiting.  Most buses go to Denizli city centre, so tell the driver you want to go to Pamukkale to ensure you get on the right bus.

I’ve read online that drop off is at BayTur’s office near Pamukkale gates, however there were only a few of us on our bus and we were kindly dropped off at our hotels.

Bookings are not needed, but you can contact the company here for more details or extra peace of mind.

Cost:
Plane – $68AUD
Shuttle – 25TL  ($7AUD)
Travel Time: Approx. 1 hour flight + 1 hour bus ride
Denizli Airport Shuttles are located at the airport exit (you can’t miss them!). It costs 10TL to Denizli town centre and 25TL to Pamukkale. Photo from Trip Advisor.

You can also arrange a shuttle with a private company – I initially arranged with DenizliAirport.com but no one turned up.  When I called wondering where they were, they basically said something went wrong and they wouldn’t be able to come to pick me up.  Kinda disappointing.    In the end I caught the next airport BayTur shuttle (as mentioned above) which I highly recommend – it’s cheaper and MUCH more reliable.

Bus

Overnight buses from Istanbul to Denizli run everyday and drop you off at Denizli Otogar bus station.  The following bus operators have daily services:  Pamukkale, Kamil Koc and Metro Turizm.

Make sure you book in advance as buses can fill up quickly.

Cost: 80TL (Approx, $24 AUD)
Travel Time: Approx 12 hours

Once at Denizli Otogar, you need to catch a minibus (Dolmus in Turkish) to Pamukkale.  Ask one of the bus company operators for help if you can’t find the gate number.

Cost: 4TL (Approx. $1AUD)
Travel Time: 30 mins

Car

It’s approximately an 8 hour drive from Istanbul to Pamukkale.  Now I spent most my time driving in Europe, but even I was scared to drive through Istanbul so I opted for a plane.


Where to stay

I stayed at Melrose House Hotel which is about a 20 minute walk from the travertine town entrance. I loved it here, I thought the place was beautiful, staff were nice and breakfast was generous and delicious! The best part?  It only cost me $36AUD per night!

The Dolmus/minibus to the Otogar also stopped just down the street from the hotel, making getting my overnight bus to Cappadocia super easy.

When to Visit:

I visited Pamukkale in May (12-13th) and while it was outside peak season, the travertines themselves still got pretty packed with people (mostly tour groups).  By 10am, there was no space on the travertines to have a quiet area to yourself.  In saying that, the town, restaurants and hotels were very quiet.  I found May a good time to visit, because there are less people, but the temperature is still warm enough to have a dip in the travertines.  If you’re looking for instagram-worthy photos of yourself in the travertines with no one around, you will probably need to visit in winter.

Your Itinerary – What to do:

Sidenote: I didn’t expect the travertines or the entire site to be as big as it was!

So this is why Pamukkale is so easy to visit in 24 hours – all the major sites are so close to each other!  Pamukkale/Hierapolis is a UNESCO World Heritage site, so you need to pay to visit it.  There are 3 entrances into the park – Pamukkale Town Entrance, North entrance and South entrance.

Entrance Times and Costs:

From April 15 till October 2 – Open from 08:00 to 21:00 every day
From October 3 till April 14 – Open from 08:30 to 17:00 every day

Entrance Cost for Pamukkale Travertine (B on map) and Hierapolis Ancient City (1-16 on map): 35 Turkish Lira

Entrance Cost for Cleopatra/Antique Pool (A on map): Free inside the complex, to swim you need to pay  32 TL (Adults) 12 TL (Kids 6+) Kids (<6) Free.

Of course, feel free to mix around the itinerary below to suit your schedule.  This is just what I did.

  1. Visit the ancient city of Hierapolis first

Start: 8AM – 9AM.  Duration: 5 hours

I give this advice for a few reasons.  The first is that majority of people swarm to the travertines first. As early as 10am I would say the travertines were crowded – and this isn’t even in peak season!  Starting at Hieropolis Ancient city means you will skip all the crowds – there were only a handful of people around when I was exploring at this time.  The second is that Turkey can get quite hot and the last thing you want to be doing is walking around ancient ruins in the heat and direct sun.  It’s best to start early to avoid the heat and to ensure you allow plenty fo time to cover the entire site.

2. Lunch Break

Time: 1 hour – 1.5 hours

There are two places you can buy food within the site.  The first are the food stalls right at the top of the travertines, next to the seating area or you can also find a number of fast food shops inside the Antique Pool Complex.  Food is a lot pricier here than down in town.

3. Heirapolis Archaeological Museum

Cost:  5TL
Time: 1 hour

I didn’t get a chance to visit here, but if you have some extra time it would be worth checking out.  The museum holds most of the sarcophagi and artefacts excavated from Hierapolis and surrounding towns in the valley.  Artefacts are well preserved and a visit here will provide the missing key to much of the references you’ll read on the plaques as you’re walking through Hierapolis.  I.E References are made to certain sarcophagi and decorations, however a lot of these are actually in the museum and can’t be seen on the Hierapolis site.

4. Swim in the Antique Pool

Cost: 32 TL (Adults) 12 TL (Kids 6+) Kids (<6) Free
Time: 2 – 3 hours

I loved relaxing in the Cleopatra Pool after a long day walking around Hierapolis.  It’s rumoured that Cleopatra is said to have swum in an earlier version of this pool, especially as Hierapolis had a reputation for being a health centre back in the day.  The pools are known to have healing properties against many skin diseases, circulation problems, rheumatism, heart diseases and many more.  The water is a lovely warm temperature that’s very comfortable to swim in, and there’s something really idyllic about swimming amongst the roman columns in this pool.  I didn’t want to get out!

5. The Travertines

Time: 6PM – Sunset 

Leaving the best until last, the travertines are quite amazing – I didn’t expect them to be as large as they were, but they go on for ages!!

In May, the sun didn’t start setting until about 8:30PM.  This means that from 6PM there was heaps of time to get photos in daylight with the pools, swim and walk around the site.  The travertines really become magical though at sunset. The pools mirror the pastel colours of the sky which is amazing to watch and great to photograph!

Enjoy!  Got any questions?  Let me know below.  Also I’d love to hear your experiences in Pamukkale!

Seeing Autumn Leaves in Kawaguchiko, Japan

A Guide to Seeing Autumn Leaves at Lake Kawaguchiko

Picture a scene where the mountain breeze is chill and crisp as you walk towards a lone temple shrine standing proudly in solemn silence in the woods. The warm autumn sunshine shines brightly through the trees, passing through a canopy of painted fall coloured leaves perfectly framing the temple in a halo of vibrant reds, oranges, and yellows.

It’s an idealistic image fitting for any travel postcard!

Though it might sound like poetic overkill, in Japan an idyllic autumn setting as I described is not too far from the imagination.

Before Japan begins to suffer the winter blues, fall’s arrival brings the spectacular sight of the trees turning color also known as kōyō (紅葉). It’s a magnificent sight to behold and has inspired many artists and poets for centuries. Today, many locals eagerly anticipate when the momiji maple trees turn crimson red to hunt for the best viewing locations. For travelers to Japan, this autumn past time is definitely something to experience if you happen to be here during the November period.

The most popular and famous spot for many Tokyoites to visit is the Hakone area near Mount Fuji where Lake Kawaguchiko comes alive with the colours and festivities of momiji’s change.

Let’s dive into what autumn activities await you at Kawaguchiko Lake as we go hunting for momiji autumn leaves!

autumn leaves

Where to See Autumn Leaves in Kawaguchiko

kawaguchiko autumn leaves

Momiji Corridor もみじ回廊

The Momiji Corridor is a walkway that runs along a small river leading into Lake Kawaguchiko. Though the walkway is 2km long, the viewing area for the autumn leaves is only at the front section closest to the lake. Still, it is the most popular place

to see the autumn leaves as it holds the local Momiji Festival, evening illuminations, and is lined with over 60 maple trees!

kawaguchiko autumn leaves

kawaguchiko autumn leavesThe colours are amazingly vibrant against the blue sky!

kawaguchiko autumn festival food

kawaguchiko autumn festival foodSome of the local treats you can eat during the Momiji Festival.

Momiji Tunnel もみじトンネル

About 3 km away from Momiji Corridor, the Momiji Tunnel is another popular photo spot for people who want to capture the autumn leaves with Mount Fuji in the background.

Despite what the name suggests, the “tunnel” reference is actually how the focal point is composed to make it appear that the momiji leaves surround and frame Mount Fuji in the distance.


View this post on Instagram


A post shared by George Yajima | Italo-Jap (@georgeyajima) on


View this post on Instagram


A post shared by Atsuya (@d5600_ak) on

Kawaguchiko Natural Living Center

Located on the north side of Lake Kawaguchiko the Kawaguchiko Natural Living Centre is a rest point that offers a different autumn scenery with Mount Fuji.

At the centre people can enjoy a coffee break while walking around the lakeside

flower and herb garden or enjoy blueberry fruit picking and fruit-related souvenirs at the gift store. If you want to walk a little further to enjoy the scenery, Oishi Park is also nearby.

kawaguchiko living center

kawaguchiko living center

kawaguchiko living center

kawaguchiko autumn leaves

Vanilla and Blueberry Mix Soft Serve. Grown and made on-site!

kawaguchiko living center

kawaguchiko living center

kawaguchiko autumn leaves

Iyashi no Sato Nenba (Healing Village)

Not too far away from Kawaguchiko is Lake Saiko’s Iyashi no Sato Nenba (Healing Village), an open-air museum and craft village tucked away in the mountainside.

Originally, Iyashi no Sato was a farming village but was destroyed during a landslide caused by a typhoon in 1966. To revive the image of traditional thatched-roof farmhouses that were iconic of the village, the local Nenba community reconstructed more than twenty houses converted into museums, souvenir shops, and restaurants.

Some of the shops in the village offer workshops on how to make traditional washi paper, charcoal, and soba with each shop specialising in a traditional local craft such as pottery or weaving.

During the autumn season, the scene of the thatched-roof houses surrounded by coloured momiji trees and farm life creates a beautiful rural scene one would expect to find in a historical TV drama.

IYASHI NO SATO NENBA

IYASHI NO SATO NENBA

IYASHI NO SATO NENBA

IYASHI NO SATO NENBA

Mount Fuji in the clouds

IYASHI NO SATO NENBA

japan lemonade summer

IYASHI NO SATO NENBA

IYASHI NO SATO NENBA

houtou noodles

Local houtou noodle soup.

IYASHI NO SATO NENBA

IYASHI NO SATO NENBA

IYASHI NO SATO NENBA

BONUS: Lake View on Route 県道710号

Although not an official photo spot, while driving towards the Iyashi no Sato Nenba Village along route 県道710号 we stumbled upon by chance a stunning view of the

mountains and autumn colours reflecting clearly off the water’s surface. It was so mesmerising we just had to stop and have a look!

Lake Saiko autumn

Lake Saiko autumn

Lake Saiko autumn

Lake Saiko autumn