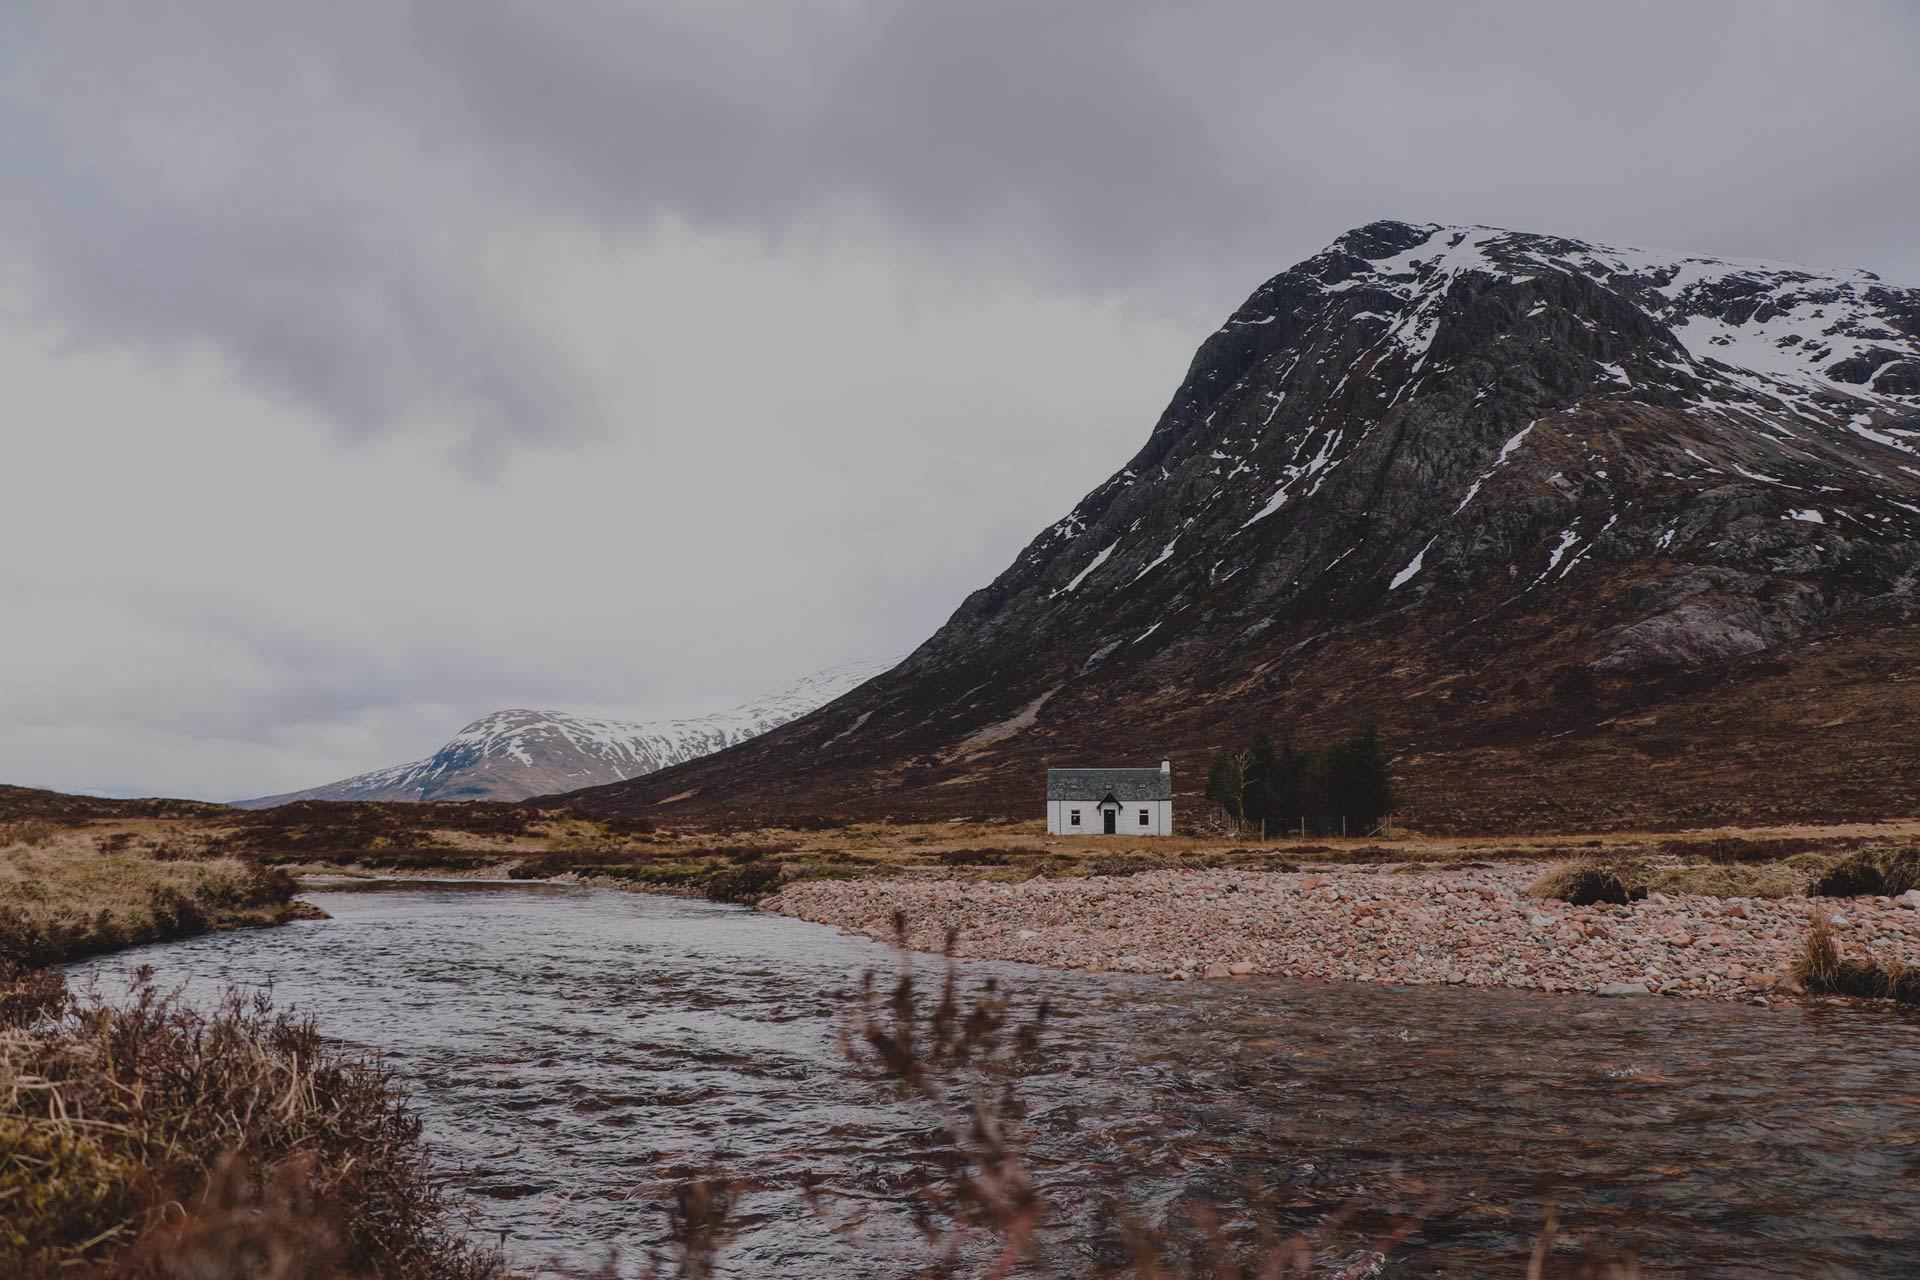
ou’ve probably seen the iconic image of a tiny, little, white hut looking lonely and dwarfed at the base of a dark and rugged mountain. The first time I saw this picture perfect image, I knew I had to go and see it myself in person.
The problem was, without even having a name to go by, this little white hut can be pretty difficult to find. Trust me, searching “Little White Hut, Scotland” into Google doesn’t get you very far.
Even after finding out its name, it was really difficult to get an exact location. Eventually, my search brought me to Glencoe, but when you know nothing about Scotland, a location that says “The North Side of the Buachaille Etive Mor” isn’t very helpful. Instead it raises a number of questions like: How big is the Buachaille Etive Mor – for all I know it could take 4 hours to circulate it before I find the hut. How am I suppose to know which side is the North Side? GoogleMaps doesn’t exactly tell you that information. Similarly, how close can you get to it by car? Is there any parking nearby? Do you need to hike there? Is it hidden or easy to see and out in the open?
So for the noobs out there who, like I was, are just trying to make their travel dreams come true, here’s a trusty guide to everything you need to know during your search to find the Lagangarbh Hut.
The Exact Location of the Lagangarbh Hut
Without further ado, let’s get into the hut’s location!
The Lagangarbh Hut is located in the Western Scottish Highlands of Glencoe Scotland, on the north side of The Buachaille Etive Mor. The coordinates are: 56.661806, -4.904396.
Being the only building in the vicinity amongst such a rugged and expansive landscape is part of its breathtaking appeal. Even though the hut looks as if it’s standing in the middle of nowhere in pictures, it’s actually not difficult to find at all! In fact, it’s right beside the main highway, the A82, that passes right through Glencoe. Visible from the road, you absolutely cannot miss it! Parking is also very stress free and simple. There are plenty of shoulders on the A82, that you can veer off into and park the car. From these parking spots, it’s just a short walk to the Lagangarbh Hut.
Referring to the map below, I’ve included 3 markers, click the icon in the top left corner to pop open a sidebar with more info. I have marked 2 of the closest parking spots on the map, but there are numerous along the highway.
As you walk towards the hut, you’ll notice the River Coupall runs just in front of it. If you want to get a closer look at the hut, there are wooden footbridges scattered around the area that you use to cross over the river.
I arrived around 4PM – 5PM and pretty much had the place to myself except for another group of photographers. It was great because by this time all the tour buses had left, so there was plenty of parking and no crowds – the best! I also visited during mid-March, which is a quieter season.
Map of the Lagangarbh Hut and Parking Areas
Use the map below to navigate to the two closet parking areas and the Lagangarbh Hut (it’s called “Glen Coe Photography House” in GoogleMaps).
Getting To Glencoe From Edinburgh or Glasgow
By Car
If you’re looking to travel to the Lagangarbh Hut from Glencoe or Glasgow, I recommend that you drive. It’s one of the most scenic, beautiful drives, plus there’s a whole heap of great places to stop off at along the way – if you’re an Outlander fan, you can a stop at Doune Castle, like I did. Altogether, the drive is around 2.5 hours which saves you a lot of time when you compare it to the 4 hours trip by public transport. The drive is very simple, I had no problems!
By Public Transport
If hiring a car is not for you, there are buses you can take from Edinburgh and Glasgow to Glencoe village. Tickets can be bought from Scottish Citylink.
The bus routes to the right show the buses and the exact route to take to get to Glencoe Visitor Centre, which is located closer to Glencoe village. You want to get off at the “Chairlift Road End” stop (according to Google, this is the closest stop to The Lagangarbh Hut, but you could ask the bus driver if there are any closer stops). According to Google it’s a 1 hour walk from “Chairlift Road End” to the Lagangarbh Hut, or just under a 3 hour walk from the Visitor Centre.
Shot of the A82 highway that passes by the Lagangarbh Hut.
Seasonality: When to Visit
ypically, it’s said that the best time to visit Scotland is during the months of April through to June, which covers spring and early summer in Scotland, and September to November, which are Scotland’s autumn months. As a rule of thumb when travelling to Europe, summer tends to be peak season which means more crowds.
To know when YOU should visit Scotland, it’s comes down to your answer to this question; “What type of Scotland do you want to see?” For me, I envisioned lush green landscapes and was initially disappointed to find that March was still very much dominated by brown/orange hues as the flora was still recovering from the winter months.
In the end, I ended up loving these colours in the landscape, but there was an initial shock. So, if you want lush, green Scotland, visit from May – August. If you want orange, auburn hues, visit during mid-late autumn or early spring like I did. If you want to see the place as a winter wonderland covered in show, visit in winter.
Below, I’ve included scenes of the Lagangarbh Hut through the seasons to help you decide when you might like to visit.
If you are interested in staying at the hut, applications are only accepted from Mountaineering Clubs, Hillwalking Clubs, Individual members of Mountaineering Scotland or the BMC (British Mountaineering Council). See details below:
ne of the most breathtaking sights in France is seeing the island of Mont Saint Michel floating off Normandy’s coastline. While it may look like a castle floating on water from afar, Mont Saint Michel is actually home to a medieval village and abbey, and was once one of Europe’s most popular pilgrimage destinations. Considered as one of the most important sites of medieval Christian civilisation, Mont Saint Michel was listed as a UNESCO World Heritage site in 1979.
For me, the most fascinating thing about Mont Saint Michel is its location as a tidal island. I absolutely loved the idea of a place that could only be accessed via a treacherous journey during low tide, as if it were some kind of mysterious and secret place. Turns out it’s not as romanticised as that nowadays, because a modern causeway has been built that connects Mont Saint Michel to the continent, making it easily accessible regardless of the tide, and a much safer journey.
You might be thinking “how dangerous could crossing the mudflats to Mont Saint Michel be anyways?” The answer is VERY DANGEROUS. In fact, Mont Saint Michel’s tides were (and still are) considered so dangerous, that the place was nicknamed by medieval pilgrims as “St Michel, peril of the sea.” The tide is said to travel at extremely fast speeds with waves as high as 14 metres. And if you thought the tide was all you had to worry about, the mudflats also act like quicksand in areas and could swallow you alive. With the journey being considered so difficult, medieval pilgrims saw it a test of penitence, sacrifice and commitment to God.
Things to See and Do
Take Photos by the Dam
ondering where I took this photo? It was at Mont Saint Michel’s dam. In fact, the dam’s design is so pretty, that I didn’t even realise it was a dam! Situated close to the carpark, the dam was my first pitstop on my walk to Mont Saint Michel. I was surprised at how quiet the dam was at midday! Perhaps most people had flocked to the Mont by this time, bu there was only a small group of 15 people sitting here and having lunch. On the opposite side of the dam, I could access a small area of grassland which had absolutely no one in shot! So I set up my tripod on the dam and took some shots with my remote.
You might be wondering, why does Mont Saint Michel have a dam? Well, it’s to regulate its water flow. Over time, human and tourist developments significantly impacted the landscape around Mont Saint Michel.
The tourist development that caused the most problems was the old causeway – a large road built on ground that connected the island to the continent. At this time, the visitor carpark was situated at the base of the Mont. The old causeway interfered with the flow of water and caused sediment to build up around the island. If nothing was done, the sea around the island would cease to exist and vegetation growth would be surrounding the island within 40 years! In 2009, a new dam was built to regulate the water from the Couesnon river, giving it enough force to push the sediment back out to sea. The carpark was removed from the base of Mont Saint Michel and moved back to the continent where a shuttle bus service helps takes tourist to and from Mont Saint Michel. Finally in 2015, the new and elegant walkway bridge was complete. Suspended from the ground, the bridge allows water and sediment to flow through without causing sediment buildup.
When you arrive at Mont Saint Michel, the first thing to do is to explore the medieval streets. Go everywhere. You’re allowed to explore all the nooks and crannies so I encourage you to! I’ve read online that many people compare the streets of Mont Saint Michel to a real life Diagon Alley and I guess it’s the closest comparison I can think of too.
When you arrive at Mont Saint Michel, you’ll cross a medieval drawbridge – still fortified with its portcullis – to reach Grand Rue, the main street of the village. The street is narrow and cobblestoned with charming medieval buildings lining either side. I was so hoping for the stores that occupied these buildings to have kept a slice of tradition, much like you still see in the little towns across France like Èze or Annecy
with their artisanal boutiques and food. But I was really disappointed – most stores comprised of gimmicky souvenir shops, modern clothing stores, modern takeaways and restaurants (some kept their traditional charm though).
Looking up from street view, gorgeous steel signs are suspended from the entrance of buildings and the crowds really do help create the illusion of bustling medieval streets. Veering to the left side, I started climbing some of the steps past the small chapel, and entered the Logis Tiphaine Museum which had a great view over the Grand Rue. Looking down from here, I was really able to take in the street, architecture and flora as a whole and it was really beautiful. Exploration is really the key to finding beautiful little surprises around the village.
Signs hanging from the buildings
View of Grand Rue from Logis Tiphaine Museum.
Visit The Museums
s you’re strolling through the medieval streets of Mont Saint Michel, it’s likely you’ll come across some museums. If you’re into the historic significance behind the places you’re travelling to, Mont Saint Michel’s Abbey and 4 museums work together to paint a complete picture of Mont Saint Michel’s 1000 year history.
The museums are quite small and you can get them done in around 20 minutes. If you’re interested in seeing all 4 museums, you can get a combined ticket for 18 euros and save a bit of money (otherwise each ticket is 9 Euro). See more on museum pricing. Find out more information on each museum below:
The Archéoscope
This museum is not really a museum, but a multimedia sound and light show that aims to tell the history and legends of Mont Saint Michel in a unique way. Involving a 3D model, video, light and holographic projections, the show aims to completely immerse the viewer, but falls short according to Trip Advisor reviews. Visitors claim the Archéoscope was a waste of money primarily because it was so out-dated and only narrated in French. If you don’t speak French, you won’t get a lot of value out of the show. I personally decided to skip this museum.
THE HISTORICAL MUSEUM
The Historical Museum dedicates itself to Mont Saint Michel’s 1000 years of history and covers information about the monks who built the Abbey and the Mont Saint Michel prisons. It houses a collection of ancient weapons, art, torture instruments from the Middle Ages, the iron cage of Louis XI and the oubliettes (dungeons). Similar to the Archéoscope, tourists have not been impressed with this museum for similar reasons: outdated wax figures, the “dungeons” were not real and made from fabricated plywood and almost everything was in French.
Museum of the sea and ecology
This museum deep dives into Mont Saint Michel’s environment – the tides and the bay’s flora and fauna. The museum comprises of models of wartime ships, commerce, fishing and boating. There’s also a video that explains the tidal phenomenon, the islands silting problems and restoration work.
Again, this museum has pretty bad reviews online, as all videos and signage are in French only.
The Logis Tiphaine Museum / Maison de Bertrand du Guesclin
Out of the four museums, I had time to visit one and I’m so glad I instinctively chose the best one! Although the reviews are also, not great for this museum, the ratings are better and I happened to really enjoy it! Again, most of the signage and information in here is in French, but this museum had access to English translation via a smartphone app (this was limited though compared to what’s available in French, but I still enjoyed it).
This museum is the historical house of Knight Bertrand du Guesclin, which he built for his wife Tiphaine to keep her safe during the wars. Bertrand was constable of the armies of the King of France (14th Century) and one of France’s best known Knights. His wife Tiphaine de Reguenel, was a famous astrologer and sorceress known for reading the stars and people’s futures. Inside, you’ll walk through various rooms of the house and a small garden and see period furniture, a bridal suite, tapestries and paintings, Bertrand’s armour, Tiphaine’s astrology cabinet and…a MIDDLE AGES CHASTITY BELT?? I was actually super intrigued by this and found it fascinating…why did she have one? Weren’t they married? Was Bertrand somewhat controlling/abusive? Did she actually wear it? Is it even real?
This museum is small, but I was actually happy for this bite-sized piece of history since I had limited time in the area. It wasn’t crowded so I could view everything at leisure. Overall, I do recommend a visit – you can see my pictures below!
Eat A Traditional Omelette
part from the amazing abbey, one of the other things Mont Saint Michel is famous for are its omelettes! The best are said to come from the famous La Mere Poulard and her traditional recipe from 1888. Today, the restaurant is immensely popular and was completely booked the day I went (much to my dismay) however there was smaller La Mere Poulard takeaway shop just opposite selling only omelettes (at least there was when I went there though I can’t find any evidence of this online, so I’m assuming it’s new!). The omelettes are world famous due to the number of famous personalities that have dined at the restaurant and you can watch them being made from the restaurant’s main window. The chef’s beat the batter to a unique and catchy beat and I wonder if this is part of the secret? La Mere Poulard’s omelettes are then souffléd over high heat making them extremely fluffy.
If omelette’s are not your thing, other traditional dishes you can enjoy include Crêpes, meadow salted lamb, Normandy apple tarte and Normandy style mussels (which I dined on mmmmm):
If you want to see medieval architecture at its finest, then look no further than the Mont Saint Michel Abbey – the highlight of a trip to Mont Saint Michel. Being shaped like a pyramid, you can just imagine the challenges faced during its construction – and remember they didn’t have our technology back in the day either! The abbey required creativity in design and extremely precise technical calculations by medieval builders.
The abbey church was built on the top of crypts, strong enough to take the weight of an 80m high church! The layout of the abbey itself is influenced by the principles of monastic life, prayer and work, and the rooms were arranged around these activities. The abbey is topped with a golden statue of Archangel Michael.
To see the abbey, you can opt for an audio guide for 3 Euro, but I would recommend taking the free tour (available in English and French year round and for a few other languages in peak season) to get the most out of the experience. It takes about 1 hour and 15minutes and you’ll explore 20 different rooms. If you’d rather be a lone soldier, there’s also a free pamphlet in various languages that guides you through the different sections of the abbey.
My favourite part of the abbey was the gorgeous views from the top viewing platform.
In summer, a light and sound display in the abbey grounds last from around 7pm to 10:30 pm. Visitors, who entered before 6 pm may linger for free, otherwise you will need to purchase separate tickets for the event.
Outside view of the abbey
The gift shop also had some interesting Manga souvenirs!
Walk Across the Bay
View of the Traversée from the Abbey
rom the ground, the bay might look like a sandy uninteresting pile, but from from the sky it looks so beautiful – it was a pleasant surprise!
If you feel like getting dirty, you can walk on the traversée just like the early day pilgrims. It is strongly recommended you venture onto the traversée with a certified guide and not by yourself – if fact I’ve posted a sign with all the possible dangers below haha.
Most notably is the quickness in which the tide can come in and the pits of quicksand that a scattered throughout. If you do a tour, the guides will point out what the quicksand looks like too.
The best way to find a guide is to prebook a tour – I’ve got some links at the end of this post, or to enquire at Mont Saint Michel’s tourist office (though it can be busy so things can book out fast!)
You can find information on the tides here and here.
Paris to Mont Saint Michel Via Public Transport
e prepared, it’s going to be a long journey. Mont Saint Michel is located about 4 hours from Paris and when taking public transport, you know that’s going to take longer. The closest train station to Mont Saint Michel is Pontorson and you can get there from the following train lines:
The direct shuttle bus from Pontorson station to Mont Saint Michel and stops at a few stops along the way. Getting off just before Mont Saint Michel (See point 4 “Route du Mont” bus stop on the map below) will stop you right near the dam and the shopping village where you can find restaurants.
While this is the typical journey, it is not the journey I took because I went for the cheapest option at the time that was suggested to me by my Trainline App. From Paris Point De Neuilly, I caught the OuiBus. It was a 5 hour ride, but very enjoyable and comfortable especially because it was direct – no changing stations etc. We arrived at 12:10PM, which is peak hour when it comes to crowds, and were dropped off in the coach parking lot (P7 on map below). It was a short work to the tourist centre, dam and the Passeur shuttle service connecting Mont Saint Michel to the continent. OuiBus is not always available and I believe only runs from Paris to Mont Saint Michel during peak season.
I found out a couple of days before that my OuiBus for the way back to Paris was cancelled and replaced with a solution via train, which was a bit more involved as a journey. From Mont Saint Michel, I caught the public bus to Villedieu-les-Poêles train station, then a train to Paris Montparnasse 3 Vaugirard. I was a little confused at first as to which public bus to catch and where the bus stop was, but the tourist centre was very helpful.
A loooong day, but definitely doable and there was plenty of time to do everything.
Arriving By Car:
Arriving by car is definitely the most convenient way to travel to Mont Saint Michel, though will cost a bit extra as you will need to pay for parking. For more details and costs, click on the links below:
How to Get to Mont Saint Michel from the car park.
The Mont Saint Michel carpark is located on the continent and is about a 35 minute walk to Mont Saint Michel. The good news is there is a free shuttle bus (The Passeur) that runs from the car park (see departure point 2 on the map) to Mont Saint Michel and takes about 10mins.
Alternatively, you can also take a traditional Maringote, used as transport by the pilgrims to venture across the bridge. This is a paid service that costs 6 Euro and takes roughly 25 mins.
UPDATE: Due to the 2020 coronavirus, some of the festivities and events for Japan’s cherry blossom season have been cancelled.
See Tokyo’s World-Famous Cherry Blossoms
e’re finally at winter’s end here in Japan and it’s time for another annual event – the season of cherry blossoms!
Each year Japan celebrates the calling of spring with the anticipation of its cherry blossoms blooming. Everywhere you look there’s a fresh lineup of local events to attend, and of course, a variety of limited edition food items and goods for sale to really get you into the spirit of the season.
As the symbol of spring, Japan’s cherry blossoms have always amassed fascination and admiration from locals and travelers making it the must-see event of the season.
But don’t just see it through the lens of a tourist passing by simply because you’re traveling. Why not make it a little more special by enjoying a little R&R and treat yourself to a day of picnics, sunshine and festival hopping just like the locals do!
Here, we’ll introduce you to the seasonal event of cherry blossom viewing in Japan and how to get the best out of the experience!
When does Cherry Blossom Season Begin
ust like checking the weather forecast before heading out, Japan’s meteorological corporation has a national cherry blossom blooming forecast based on the standard pale pink cherry blossom with five small petals.
Although the meteorological corporation’s starting dates are a great help to plan your plane flight, it’s also important to know their predictions can be, at times, misleading. If you arrive too early, you’ll see more closed buds than flowers but wait too late and you’ll see more green leaves than flowers. For me, more importantly,
their date predictions on when trees will be in full bloom will guarantee you an unforgettable sight of the cherry blossoms and take out the guessing work.
Also, take note that the first month of spring still brings strong winds and the rare typhoon which can spoil the blooming season’s longevity. But don’t fret! There are other kinds of cherry blossoms with varying shapes and intensities in colour which bloom later to enjoy should you miss the early blooming time. See this article for more details.
eno Park during cherry blossoms season brings big crowds of people setting up their picnic spot but don’t let that discourage you!
Ueno offers a nice glimpse into Tokyo living and also a peek at the gorgeous spreads salarymen companies prepare for their workers. During the evening, the park lights
up their trees with lanterns to continue the festivities into the night.
You can also take advantage of the nearby attractions such as Ueno Zoo, Ameyoko, and other shopping streets, the local temples for some sightseeing and it’s also an easy stroll to Akihabara.
Access: Next to Ueno Station.
2. Nakameguro
little bit of Kyoto in Tokyo, Nakameguro is beautiful during cherry blossom season as you can see rows of overflowing cherry blossoms growing along the riverside. Nakameguro is not only pretty during the day but the night as well when the trees are lit up and the local nightlife begins.
Take advantage of what’s in Nakameguro and enjoy the boutique shopping, international food scene, and great bars.
Access: Ikejiri-Ohashi, Meguro, or Naka-Meguro Station.
3. SHINJUKU GYOEN
he “Manhattan Central Park” of Shinjuku you could say, this spacious and peaceful oasis in the middle of Tokyo’s liveliest business district has around 1,100 cherry blossom trees.
Entrance to Shinjuku Gyoen is ¥200 and offers a unique opportunity to get up close and personal as their cherry blossom varieties “Weeping Cherry” and “Tokyo Cherry”
are so large, their branches span wide and touch the ground. It’s a great photo spot and you can move freely around the branches making it feel like you’re intertwined in its flowers.
Access: A short walk from Shinjukugyoenmae Station, Sendagaya Station or Shinjuku-sanchōme Station
oving a little further from Central Tokyo’s CBD, Inokashira Park is located in the ever cool neighbourhood of Kichijoji. The park is quite big and large enough to fit a pond, a petting zoo, and an aquarium within the grounds!
The crowds, especially young couples, during cherry blossom particularly enjoy the swan boat and boat rides but be warned. Local legend has it that the jealous goddess
Benzaiten curses couples who ride the boats to break up soon after.
Regardless of the tale, Inokashira Park is a great location for a cozy weekend. Enjoy the live street performances, artist market and it’s also a short walk to the Ghibli Museum.
lthough not an overly touristy location, Nakano has many cherry blossoms which line the main street which leads conveniently to the ward’s locally run sakura festival at Arai Yakushi Temple.
The sakura festival is a must visit since it’s a great way to experience a typical Japanese matsuri-style festival that mainly occurs in the summer. You’ll see lots of people dressed in yukata and the food and entertainment are great for those casual
evenings out.
The area is also a nice mixture of laid back old school charm mixed with an Akihabara otaku vibe since Nakano is home to Nakano Broadway, a hobby enthusiast’s paradise.
Access: A short walk from Nakano Station.
What to do During the Season
1. Sakura Festival
robably my favourite thing to do during cherry blossom season, there’s nothing like the sound and energy of a festival to get you into the spirit of things and sakura festivals offer great entertainment both traditional and modern.
During sakura festivals, and depending on where you visit, there are many types of performances to see other than the usual live music and dance acts. Venturing to
more local neighbourhood areas like Nakano, you can enjoy local fanfare like carnival games and see local talent shows while more international areas like Nakameguro have a more western vibe and offers foreign treats like mulled wine, sangria, German beers, and sausages to enjoy mixed with traditional performances such as buyō (a traditional performing art similar to kabuki theatre).
Playing traditional matsuri games at Nakano Sakura Festival
pend a unique day enjoying the local scene by setting up your blue tarp mat having a picnic under the shadow of a billowing flower tree. Hanami or “flower viewing” is a popular picnic event where people enjoy eating and drinking while viewing flowers. Although there are no “rules” to doing hanami right, there are a few staples to the activity which every local seems to follow:
The Essentials for Hanami
THE FOOD: Lunch Boxes, Side Dishes, Snacks, and Yes, Alcohol
Wondering what a typical hanami spread looks like?
Although homemade obento boxes are popular, hanami food is generally store-bought for convenience. The food (even obento boxes) are shared amongst everyone and include extra sweet or savoury snacks as some hanami parties can last until the evening if planned.
Some popular food ideas include karaage, lunch boxes, sandwiches, onigiri (rice balls), takoyaki, yakisoba, hanami dango, sakura mochi, and fruit.
Another fun thing to do is to cheers the arrival of spring with a drink in hand. During the festivities, it is legal to drink alcohol openly in public areas and you can also find drink stands that sell chilled cans of beer should you forget yours. So grab your chuhai, beer or wine and kanpai!
Where to Purchase: convenience stores and local supermarkets like Maruetsu, Peacock or Seiyu.
FOR SITTING: Picnic sheets and sitting cushions
With the chaos of multiple hanami parties happening around you, space will get very tight fast.
Forget about setting up the tables and chairs and do as many other people do and simply spread out a tarpaulin mat on the ground to enjoy your picnic party.
Unfortunately, the ground may be hard and uneven, so I recommend buying inexpensive sitting cushions from the 100 yen store to help feel more comfortable.
Also, don’t forget to take your shoes off before sitting down! The no-dirty-shoes-allowed rule also applies here too.
Where to Purchase: convenience stores, local supermarkets, and 100 yen stores.
FOR EATING: Paper Plates, Disposable Cutlery, and Tissues
Just like with any other party having extra plates and cutlery will come in handy especially with bigger groups. Another pro tip is to bring some wet wipes or “oshibori” for when it’s hard to locate a convenient way to wash your hands or clean up spills.
Where to Purchase: convenience stores, local supermarkets, and 100 yen stores.
FOR FUN: GAMES
Looking at flowers all day is nice and all but you can really liven up a party with some games to play as well.
Simple party card games can be found at the 100 yen stores and offer an interesting insight to the childhood of Japanese locals or, something more familiar like Cards Against Humanity or Uno and you’ll ensure everyone has a riot for hours on end.
Where to Purchase: 100 yen stores, Bic Camera, Yellow Submarine and Don Quixote.
THE CLEAN UP: Garbage Bags
Just as pretty as the cherry blossoms are on the tree, keeping the environment clean and tidy is also expected of everyone as much as possible.
Do the right thing and trash your garbage responsibly by saving time and effort and separate bottles, burnable garbage, and non-burnable garbage in bags before taking them to the designated garbage area.
3. Enjoy Spring with Cherry Blossom Flavoured Treats
id you know that cherry blossoms are also edible?
Although I am not the greatest fan of the taste as I think it’s too similar to a soap fragrance many cherry blossom foodstuffs mixes fruit flavours like strawberry, peach or cherry to sweeten its flavour.
The most popular limited edition item to get would be the Starbucks sakura edition frappuccino or latte that’s only available in Japan but do venture around to taste all the shops have to offer.
You can also buy cherry blossom tea, chocolates, and alcohol that’ll make great souvenirs.
4. Night Illuminations (Yozakura)
eeing flowers during the day is not the only time the locals go to see these pretty flowers. Yozakura or “night cherry blossom” is a common nighttime event for locals to enjoy the sight of these flowers lit up like glowing clouds.
The best places to head for yozakura are Chidorigafuchi Park, Rikugien Garden, Nakameguro and Ueno for their impressive displays.
ike wildflowers you’ve been to places others never heard of and you’ve bloomed in places no one speaks of…
– f a s c i n i t y
When I think about the fact that I only spent 2 days in the Dolomites, I instantly regret it. And to think, I was about to cut this segment out of my trip entirely thinking I didn’t have enough time. What a gigantic mistake THAT would have been!
There is so much to explore in the Dolomites region alone, that you would need at least two weeks to see and experience a significant portion of it. In my short stay, I only had the opportunity to visit two places.
In my last post about this region, I brought you Lago di Braies, but I have to honestly say that Alpe di Siusi was the highlight of my entire trip to Europe. I have never seen a natural landscape look so beautiful, so perfect and idyllic. It’s sheer majesty, expanse and beauty almost seems otherworldly, powerful and transcendent. You can’t help but stop, find a place amongst the wildflowers and just soak up the surroundings and sounds. Having the place all to myself was also an added bonus – how did I get so lucky?
Geology – How Was Seiser Alm Created?
find geology particularly fascinating – especially when it comes to unique landmarks. So, if I asked you how the Dolomites were formed, what would you guess?
A volcano explosion? Maybe an earthquake? If you guessed either of those, you’d be
wrong! The area was in fact a giant coral reef that began forming around 250 million years ago in the Thetys Ocean. The rocks, originally limestone, accumulated so much pressure they transformed into Dolomite. When the sea retreated, the rock was open to the elements and sandstone sedimentation. Over time, the sandstone eroded more easily than the dolomite, creating the jagged rock formations we see today.
The Legends of Alpe di Suisi / Seiser Alm
f you’ve read my Lago di Braies post, you’ll know this area is extremely rich in it’s folklore – folklore that is the kind found in fairytales. There are the Gannes – spirits of the springs, whose water abilities help to cure all kinds of ailments, salvans – wild dwarves who are followers of King Laurin, giants and of course, witches & warlocks. It’s really not hard to feel the otherworldly magic when you’re here.
While this area is home to thousands of legends, I’ll go into detail on the legends behind the two main peaks in the area: the Sassolungo/Langkofel Group and the Sciliar Massif.
As it was known, Sassolungo, a local thief in the area, had a particular penchant for stealing chickens from his neighbouring farmers. Whenever they complained, Sassolungo was always prepared with an excuse, blaming it on the local foxes or eagles. Unable to get him to confess, the farmers decided the only way to make this problem stop was to catch Sassolungo in the act. The next time Sassolungo tried to steal a chicken he was caught and called up to testify before the giant’s high court. Sassolungo’s pleas of innocence fell on deaf ears and as soon as the giants delivered their sentence, the ground beneath Sassolungo broke apart and he began to sink into the ground. In attempts to break freak, Sassolungo reached up with his hand
into the sky, but it was too late. Today the only existence of Sassolungo on Earth are his 5 fingers, reaching toward the sky, forming the Sassolungo peaks.
While not everyone knows the legend of the Sassolungo peaks, one legend everyone is familiar with is that of the Sciliar Witches. That’s right, witches from near and far would come flying on their broomsticks to meet on the ridge of the Sciliar. How else would you explain the mysterious thunder storms that only seem to hover around the Sciliar Massif? It must be the work of witches.
Historically, the ‘witches’ were local women who used herbs to cure illnesses and carried out rituals promoting a good harvest. However with the growth of Christianity during the middle ages, witchcraft became seen as satanic worship. As a result, it is said that 9 women were sentenced to death for being witches and weather makers in the area.
Only one witch named Martha was a good witch, especially with children and nature. She is even known to be able to turn herself into a squirrel and is the most famous witch in the area. It is important to know, that these myths and legends are still alive today and you can even go on tours with a Witch named Martha…who knows, maybe she’s the same one from the legends!
ith so many things to do in Seiser Alm/Alpe di Siusi, and a great deal more in the Dolomites, a day trip really isn’t enough. So if you’re reading this and wondering how long to spend here, yes add in as many extra days as your itinerary will allow! Regardless of how many days you can spend here, making the most of your time is important. So here is a list of things you can do in the area – pick and chose the sights and activities that suit you best.
How to Use This Map: The map below is an interactive map you can use to find the locations mentioned in this blog post. To use the map, click the icon in the top left-hand corner to pop open the navigation bar. Here you can click on each location to navigate to it.
Take Amazing Photos
eing a lover of photography, I spent my time here doing just that. It seems that everywhere you look is another stunning photograph and I found myself completely lost in the moment. I know you’re probably thinking two things 1. How is there nobody around in the photos? 2. Where is this location?
To answer your questions, I absolutely do not know how I got so lucky with not having anyone in the area when I arrived. I did take these photos after 5PM and it was a cloudy day that suggested rain was coming. I also visited in early June which is technically still the shoulder season. Over my time capturing photos I saw one other photographer, who set up further up on the hill behind me and a group of hikers. Other than that, there was no one. And it was perfect!
Finding the location was more of a challenge. I had seen this exact view online prior to visiting, but I couldn’t find anyone that had mentioned an exact geo-location. So I basically took a giant stab in the dark and was so stocked when I actually found it.
While you can hike to this location, I actually drove here – but be careful, I shared my location with another photographer I met on my journey and he ended up getting a parking ticket :S Either I got lucky, or he got incredibly unlucky.
Without knowing the rules too precisely, the main town of Seiser Alm, Compaccio/Compatsch is closed to traffic between 9AM – 5PM. I arrived after this time, so this might also be why I didn’t have any problems with parking tickets. You can read more about the traffic regulation rules here.
Find this photography location at Location 1 on the interactive map.
Hike To The Mysterious Witches Benches
t’s no guessing that this beautiful area is home to some amazing hikes. In fact, there are a total of 43 hikes in the area, all with varying difficulties and durations. For a list of all hikes and details, please see here.
However the most famous hike is to the summit of the Puflatsch / Bullaccia where you’ll find odd-shaped rock formations that look like armchairs. These are known as the Witches Benches and it is here that the witches would sit of an evening to dance and enjoy the view of the Val Gardena and villages below.
This trail is suitable for families (no strollers) and you’ll be rewarded with beautiful panoramic views of the villages Castelrotto and Laion. There’s also a place to eat on the hiking trail if any little ones start getting restless.
Find this location at Location 2 on the interactive map.
This map has very clear labelling of all the peaks in the surroudning area and hiking trails
Credit to: ritterhof.com
Climb The Dolomite Peaks
Climbing fans, there’s something special for you too. The area hosts 4 fixed rope routes, suitable for beginners and expert climbers. For more details on the routes, please see here.
Explore The Nearby Villages
he Seiser Alm / Alpe di Siusi holiday area is home to 4 historic villages which you can explore: Castelrotto, Fie allo Sciliar, Siusi allo Sciliar and Tiers al Catinaccio. These villages are known for their historic traditions still practiced today and their amazing cuisine. Read below for a little info on each village:
Castelrotto / Kastelruth:
Being the largest of the villages near Seiser Alm, Castelrotto/Kastelruth is a picturesque village with a historic town centre. Castelrotto is know for it’s beautiful architecture showcased through the village’s Baroque Church Tower and Classical Parish Church. The most wonderful experience of this village are its historic traditions which have been passed down from generation to generation and are still practiced today.
Find this location at Location 3 on the interactive map.
This village lies at the foot of the legendary Sciliar/Schlern Massif and is known as the door to the Dolomites. Out of the four surrounding villages, this one is very close to Seiser Alm/ Alpe di Siusi and is the only village with a direct cable car to the plateau.
Siusi allo Sciliar is home to numerous themed trails such as the Geologist’s trail, where you can explore 270 million years of the Earth’s history through the rock layers of the Rio Freddo /Frötschbach. Or travel in the footsteps of poet and Knight Oswald von Wolkenstein and discover the ruins of Castelvecchio (Oswald’s home) and Castel Salego. Or if food is more your thing, the mushroom trail will take you through the Laranza forest, home to various mushrooms such as the boletus, chanterelle, fly agaric and more. Information boards along the way, will have a mushroom connoisseur of you by the end of the trail!
Find Seis at Location 6 on the interactive map, Castelvecchio at Location 7 and Castel Salego at Location 8.
Picture credit: www.seiseralm.it
Ruins of Castelvecchio. Picture credit: www.sentres.com
Fiè allo Sciliar / Völs am Schlern
For travellers looking for a health retreat try Fiè allo Sciliar. Known as the home of the hay bath, this village has become somewhat of a health resort. So what exactly is a hay bath? A tradition held for over 110 years, a hay bath involves being wrapped in healing herbs cut exclusively from the unfertilised meadows of Seiser Alm / Alpe di Siusi. These herbs and grasses often include a mix of thyme, anica, cinquefoil and gentian. The secret is being wrapped in these herbs at temperatures of 40 – 50 degrees where sweating and breathing in the alpine herbs helps to purge to body and creates immuno-stimulating effects.
Now, I know we’re focusing on Spring time, but Fiè allo Sciliar is also known for its food. If you visit in October, you’ll be invited to participate in the culinary festival of Völser Kuchlkastl, which basically means enjoying a range of South Tyrolean dishes such as “Brennsuppe” (gruel), buckwheat noodles and mutton, alpine herbs, local mushrooms and plenty of other natural ingredients. Find out more here.
Finally, a visit to Castel Presule / Schloss Prösels will have you discovering the history of the witch trials that took place here 500 years ago. With a history that dates back to 1279, Castel Presule was opened to the public in 1982 and now offers guided tours. Inside you’ll find a museum with weapons, paintings and drawings. Until recently, the castle was only open for viewing in spring/summer, but is now available to visit all year round.
Admission Costs: Adults 9 Euros & Children 6+ 5 Euros. Free entry with Museumcard of Museummobile Card and for children under 6.
How to get there: Catch bus 176 (Siusi – Fiè allo Sciliar) to the castle complex or enjoy a 2 hour walk from Fiè allo Sciliar via the hamlet Umes to Castel Presule.
Castel Presule. Image Credit: Hannahelia.com
The famous Hay Baths. Image credit: www.thecut.com
Tiers am Rosengarten / Tiers al Catinaccio
The last of the villages is Tiers located at the foot of the famous Rosengarten / Gruppa del Catinaccio. The Rosengarten is a massif known for its pink glow at sunset (alpenglow). It is famous in the folklore legends of King Laurin and his rose garden, used to explain the phenomenon of Alpenglow.
Because of it’s beautiful location in the Schlern – Rosengarten Nature Park, it is a stunning location for numerous hikes, climbs and mountain biking routes.
Laghetto di Fiè /Völser Weiher Lake is classed as one of the cleanest lakes in Italy by the Legambiente, Italy’s biggest environmental protection organisation. Of the eight swimmable lakes in the Dolomites regions, Laghetto di Fiè boats an intact ecosystem, outstanding water quality and a beautiful view of the Sciliar/Schlern, making it a popular destination for swimmers.
Find Lake Fiè at Location 10 on the interactive map
Discover South Tyrol's prettiest Alpine houses
Since you’ve just come from enjoying a dip in the gorgeous Fiè Lake, if you continue your walk along trail #1 you’ll reach South Tyrol’s prettiest Alpine Hut, Malga Tuff. Continuing further on, you’ll reach Hofer Alpl an alpine restaurant and inn. From Hofer Alpl’s sun terrace, you’ll enjoy a breathtaking view of the surrounding villages and alps: Trentino mountain region, Mount Cevedale, Gruppo di Tessa / Texelgruppe National Park and Ötztal Alps /Alpi Venoste.
Find Malga Tuff and Hofer Alpl at Location 11 & 12 respectively on the interactive map.
Paragliding
If you think the landscape is beautiful from the ground, imagine seeing it from the sky! Paragliding in the Dolomites is perfect for experienced and new paragliders. From the Spitzbühl launch site – known for its ideal conditions and thermal currents – fly close to the Sciliar solo or in tandem with an experienced paragliding pilot. For those flying with an experienced pilot, all flying equipment will be provided.
How To Get There
Alpe di Siuis/Seiser Alm is an alpine plataeu located in the Sciliar-Catinaccio/Schlern-Rosengarten National Park in the South Tyrolean Dolomites in Italy.
GETTING TO THE DOLOMITES REGION – CLOSEST AIRPORTS
There is no direct flight to the Dolomites region, so the closest airports in Italy are Verona, Venice Marco Polo & Treviso and Milan. In Austria, the closest airport is Innsbruck with Munich being the closest in Germany. From here you can drive or take public transport to Seiser Alm/Alpe di Siusi.
Car
As you know, car is my preferred option for getting around when travelling, so I drove from Venice Marco Polo airport to the dolomites region. It was a really easy drive, despite having to figure our how to pay for the toll roads on the route! Going direct from Venice Marco Polo Airport is a 3.5 hour drive.
After my time in Seiser Alm, I planned to visit Lago di Braies. The drive from Seiser Alm to Lago di Braies was approximately 1 hour and 45 mins and GoogleMaps took me through the little mountain roads, which were absolutely beautiful!! A gorgeous drive.
Train
Bolzano, the capital of South Tyrol, is located on one of the main European railway routes and has direct public transport to Seiser Alm/Alpe di Siusi. This station can be easily reached from Munich (Germany) and Innsbruck (Austria) as well as from Verona, Rome, Venice and Milan in Italy.
Bus
From Bolzano, Bressanone and Chiusa stations you can find direct bus links to Seiser Alm & nearby villages. Below I’ve included a map of the bus routes and a link to download the timetables for each route.
It is important to note that the transport system in this area is quite unique. What I love about the Dolomites, is their focus on preserving the natural environment by offering a great public transport system. While you may choose to take a car to the destination, once you’re in the area, public transport is a smarter and cheaper choice – especially Seiser Alm is car free between 9AM and 5PM. Depending on when you’re visiting and the activities you plan on doing, Alpe di Siusi offers different types of passes:
Holiday Area Live Card
This card is free of charge and is provided by accomodation providers in Castelrotto, Siusi, Fie allo Sciliar and Tiers.
Provides various discounts on chairlifts and transportation cards
Provides single ticket access to all types of public transport.
Unrestricted use of the Seiser Alm Aerial Cableway and the Seiser Alm Express (bus route 10)
Unrestricted use of the Shuttle Bus Service (bus routes 2, 3, 3A, 4, 5, 13 and 15) around the Alpe di Siusi, the Almbus (bus route 11) and the Bus Piz (bus route 14).
Unrestricted use of the Seiser Alm Aerial Cableway and the Alpe di Siusi Express (bus route 10)
Unrestricted use of the Shuttle Bus Service (bus routes 2, 3, 3A, 4, 5, 13 and 15) around the Seiser Alm, the Almbus (bus route 11) and the Bus Piz (bus route 14)
Unrestricted use of the Bullaccia Aerial Cableway, the Aerial Lifts Spitzbühl, Panorama, Florian (Alpe di Siusi) and Marinzen (Castelrotto)
Ski pass: Great for those who plan to spend most of their time skiiing or snowboarding.
Nordic Pass: Best for those who plan to spend their time cross-country skiing. The Nordic pass allows you to use the cross-country skiing courses as many times as you like for free. Without the pass it costs 6 euro for a day ticket, 30 euro for a weekly ticket and 70 euro for a season. The pass includes unrestricted use of the Shuttle Bus Service (bus routes 2, 3, 3A, 4, 5, 13 and 15) around the Seiser Alm and the Almbus (bus route 11).
You can download the timetables for each route here. See page 12 onwards.
Some information on the buss routes:
Shuttle Buses (Routes 1, 2, 3, 3A, 4, 5 and 15)
Accepts the following tickets: Combi Card, Seiser Alm Card Gold, Nordic Pass, Mobilcard and all tickets of the Public Transport Services Alto Adige/Südtirol.
If you have decided not to purchase one of the above tickets, you can also buy tickets from the Automatic Ticket Distribution Machines. One day tickets are also available for purchase at your accomodation, information office of Siusi and the Alpin Sports Company in Castelrotto. You can’t buy tickets on the shuttle buses:
One day ticket: 1.50 euro
3 day ticket: 3 euro
7 day ticket: 5 euro
Public Transport Buses (Routes 170, 171, 176, 177 and 185)
Tickets for the shuttle buses (1-day, 3-day, 7-day, Combi Card, Nordic Pass and Seiser Alm Card Gold) are not valid on these buses. You will need to purchase these separately.
Mobilcard Südtirol/Alto Adige is valid on all public services.
Tickets can be purchased on the bus
Seiser Alm Express (Route 10)
Combi Card, Seiser Alm Card Gold, and Nordic Pass are valid with this service. All other tickets and Mobilcard are not.
Tickets can be purchased on the bus
Round trip tickets cost 17 euro.
Almbus (Route 11)
Only valid with Combi Card, Seiser Alm Card Gold and Nordic Pass are valid with this service. All other tickets and Mobilcard are not.
Tickets can be purchsed on the bus for at Automatic Ticket machines at Alpe di Siusi.
Tickets cost:
One way – 2 euro
day ticket – 4 euro
Almbus (Route 12)
No passes are valid for this bus, you must purchase a ticket.
Tickets can be purchased on the bus for at Automatic Ticket machines in Saltria.
Tickets cost:
One way – 3.50 euro
day ticket – 6 euro
Map
I found this map very useful in helping to piece together where everything is. In it, you can clearly see where Val Gardena is in relation to Seiser Alm as well as the significant landmarks. Credit to: Mappery.com
Our TOP PlACES TO STAY
As access to Seiser Alm is car-free during the hours of 9am – 5pm, you want to ensure you’re staying somewhere where access to Compatsch (main village on Seiser Alm) is easy. Ideally, you would want to stay in Seis (Siusi allo Sciliar) Castelrotto or Saltria where the direct cable car or buses to Compatsch / Compaccio are available. Staying outside of these areas is fine too, but it will mean additional transfers may be required before you’re able to reach Alpe di Siusi. See below for a list of recommended places they are listed from cheapest to most expensive:
Residence Antares – Located in Selva di Val Gardena, it is a 10 min drive to Ortisei, where bus connections are available to Alpe di Siusi.
Great Dolomites Day Tour: From Bolzano explore the Ega Valley – Lake Carezza – Costalunga Pass – Fassa Valley – Vigo di Fassa – Canazei – Sella massif – Pordoi Pass – enjoy a cable car to Sass Pordoi – Gardena Valley – Ortisei, then back to Bolzano
Trekking in the Dolomites: From Bolzano explore the Isarco Valley and Pusteria Valley – Misurina Lake with view of the 3 Peaks of Lavaredo – Auronzo Refuge, then enjoy a circular hike around the Three Peaks of Lavaredo and hike the great Dolomites Road back to Bolzano.
Dolomites Full Day Excursion: This tour combines parts of the Great Dolomites Day Tour and the Trekking in the Dolomites tour, with stops at local vineyards. Pricing is for a group of 6 people.
From the lovely pink cherry blossoms of spring to the fiery red autumn leaves in fall, every change of the season shows off the beauty of Japan’s local nature. There are a number of flowers, plants, and local scenery that are worth seeking out during full bloom that nationally represent each season – even the locals treat it as if Japan’s four seasons possess some particular quality unique only to their own country.
Autumn in Japan is gorgeous for nature and is my favourite time of the year here. I would even argue it’s prettier than springtime (I know, gasp!).
A popular scenic sight in autumn located near Tokyo in Kanagawa’s Hakone is the pampas grass fields of Sengokuhara. It’s a breathtaking hillside landscape filled with overflowing tall gold-toned grass and looks stunning through the camera lens where you will be moved by the overwhelming wonder of the scenery mixed with the warm autumn sun. It was also voted the “Best 50 scenic spots in Kanagawa” and the “Best 100 spots to view flowers in Kanagawa.”
How can you step into this waking daydream?
Follow me to know the ins and outs of this heavenly field of wonder.
The Best Time to Visit
SEASON
There are four different stages that Sengokuhara’s pampas grass fields go through to get to full bloom:
As a no-brainer, it is best to avoid visiting in March as the field will be charred to promote good growth and protect the landscape from other intrusive trees and weeds. If you do visit during summer, you can enjoy the fresh green fields but I highly recommend to visit in November when the grass has turned fully into its signature gold.
TIME
Unfortunately, though the best viewing period is when the field is completely coloured gold it is also the time many people visit the fields. They can get quite crowded particularly on a good day after 12PM.
However, being a public site it is open at all hours so you can get there as early in the
morning as possible to have the place to yourself.
Alternatively, you can go in the late afternoon to catch the sunset. During either time, the light will filter through the grass which will increase its radiance.
Although the weather was raining and overcast when I went, I was still able to enjoy the scenery and take some nice photos!
The fields are not only great for nature photography but also fashion portraits too!
Although the field area itself is very large and wide there is unfortunately only a single walk path that people can walk through. There are plans to extend it in the future but for now, you can only walk up and down along the rocky pathway. The good thing though is that you can still get up close and touch the grass but not damage it, of course.
The main path has a lot of potholes and is not paved so wearing closed toe shoes are
best when visiting. Alternatively, there is a paved trail portion on the side should the main path journey be too difficult to walk or becomes muddy due to rain.
Once you make it to the end at the top you can get a great view of how the grass look like rolling waves and see how vast and far the grass can grow on the hill.
STAY DURATION
After taking some snaps and wondering around a bit, I would say the whole experience took around 30 minutes to 1 hour. Sengokuhara’s Pampas Grass Field is a good pit stop to walk around and do some scenic exploring but a good point to note
is that it isn’t the best place to plan an entire day around and traveling to the area can be a pain in the neck to get to if you are relying on the public transport’s hourly time schedule.
The view going up.
The view going down.
GENERAL INFORMATION
PRICE
OPENING HOURS
How to Get There
Hire a Car
As rural areas in Japan have slower public transport timetables than urban areas, going by car is the best way to get from place to place.
Google Maps and Apple Maps in Japan both work well in English and Japanese and makes driving a breeze if you are not familiar with the local language. Additionally, most rent-a-cars in Japan are equipped with an inbuilt navigation system should you not have access to the internet while traveling.
Arriving by Bus
There are two main ways to take the bus to get to the Sengokuhara area (from japan-guide.com):
From Hakone-Yumoto Station, take the Hakone Tozan Bus, Togendai Line (Route T) (30 minutes) → to Sengoku Kogen; the field is near the bus stop
From Shinjuku Station, take the Odakyu Hakone Expressway Bus (roughly 2 hours and 11 minutes) → to Sengoku Kogen; the field is near the bus stop
OTHER PLACES OF INTEREST
Owakudani Valley
Owakudani Valley or as the locals call it “Jigokudani” (the Valley of Hell) is a 3000-year-old volcanic valley with active sulfur vents that spew out volcanic gases and steam. As a hot springs area, it is famous for their black coloured eggs believed to extend
one’s life by 7 years! Don’t miss the upward trail by taking the Hakone Ropeway to see how they boil the eggs and appreciate the views of Lake Ashi and Mt. Fuji from the top.
Chisuji Falls is a small but pretty forest waterfall with hiking trails to enjoy. It’s called “the waterfall of a thousand threads” because the water spills between the rocks like many thin “threads.”
It’s surrounded by maple trees and would no doubt look amazing during autumn time but summer time has another special surprise. In July during the evening, hundreds of fireflies gather and glow creating a mystical sight for the eyes.
Lake Ashi is a great place to enjoy a lot of tourist-friendly attractions like traveling on one of the famous Lake Ashi pirate ships that cruise around the lake, the Hakone-en
Aquarium, Hakone Tokaido Checkpoint as well as visit the many local shops and nature walks that are accessible via here.
Temple-hop along Hakone Shrine
If you do head to Lake Ashi you can also visit the famous Hakone Shrine. It is famous for its tori gate situated as if it is “floating” in the water and is a popular photo spot
for visitors. There are also two other shrines nearby that are worth the visit – the nearby Kuzuryu Shrine as well as Hakone-Mototsumiya Shrine to see the best view of Mt Fuji (see my guide here).
As she plunged into the water
Crystal clear and deep
She realised that all her secrets
The fish would surely keep
Below the water’s surface
Her eyes open wide
In this underwater world
Her thoughts she wouldn’t have to hide
As she danced under the water
Her precious heart released its sheathe
In this palace below a sheet of glass
She could finally breathe…
By H.C.
Welcome to the Kingdom of the Fanes
For a place that looks like a fairytale with its crystal clear, blue-green waters and a stunning backdrop of the Croda del Becco, it’s only fitting that it comes with its own mythological legend right? In fact the whole of the Dolomites is home to hundreds of stories and legends, but Lago Di Braies or Pragser Wildsee, is home to one of the most well known legends in the area: The Kingdom of the Fanes.
Lago Di Braies is one of the largest lakes in the Dolomites region and a UNESCO Heritage Site. Considered one of the most beautiful lakes in the world, it’s not hard to imagine elves, faes, dwarves or an ancient kingdom once residing here.
Read on for your ultimate guide and find out why you should add the ‘Pearl of the Dolomite Lakes’ to your Italian travel itinerary!
The Legend of Lago Di Braies
Long ago, the area that is now the Fanes-Sennes-Braies Nature park, was home to a peaceful Kingdom in which its people were allied with marmots (a large native squirrel-type animal). The Queen of the Fanes decided to marry a foreign king, who, craving power, took control of the kingdom.
Eager to expand his kingdom, the king turned his daughter, Dolasilla, into a powerful warrior. In return for helping the dwarves, Dolasilla was gifted with invincible armour and unfailing arrows. They warn her however, that the armour’s powers would disappear if she were to ever marry. After many conquests and expanding her kingdom, Dolasilla meets Ey de Net, an enemy warrior and the two fall in love. They decide to marry.
Fearing the end of his kingdom, the king opposes the marriage and betrays Dolasilla by selling her and his people to the enemy kingdom, in return for the entrance to the legendary land of plenty “Aurona”. The king flees, but Dolasilla fights to save her people and is killed in battle. The traitorous king is turned into stone and the surviving Fanes find shelter with the marmots living inside the mountains surrounding Lago Di Braies. They continue to wait there until the silver trumpets sound, marking the rebirth of their Kingdom.
Things to do
PLEASE NOTE: Lago di Braies is a UNESCO World Heritage Site, please do not litter or destroy nature. Take all waste with you!
How to Use This Map: The map below is an interactive map you can use to find your preferred location. To use the map, click the icon in the top left hand corner to slide open the navigation bar. Here you can click on each location to navigate to it.
1. Go Hiking
If you’re an early riser like me and found yourself at Lago di Braies around 6am, then a morning hike might be just the idea for you – especially since a lot of the main activities don’t open until 10am. The area is pretty much empty at this time so it’s the best time to skip the crowds and enjoy the scenic beauty in peace and quiet and…all to yourself! The best kind of experience right?
The most easiest and well known hike is the route around the lake, which is suitable for adults and children over 7. It is recommended to walk the route clockwise, finishing at the chapel for a slightly easier experience. The route takes you beneath a mountain, up and down a large amount of stairs and it does get quite high at times. There is a wooden railing along some parts of the track as well.
Time to complete: 1.5 – 2 hours
Along the way, you will see paths diverging off – that’s because there are actually several hikes you can do from Lago Di Braies and a total of 34 hikes in the Braies valley all of varying difficulty. See below for a list of hikes and routes taken from the travel brochures I accumulated on my trip.
Route Difficulty: Easy | Medium | Hard
During my walk around the lake!
2. Go Climbing
Another activity open at all hours is rock climbing. Around Lago Di Braies, there are two main climbs, one is a fixed rope route and the other one is a climbing crag.
Fixed Rope Route (Via Ferrata) (8)
Difficulty: ★★
Walking Time: 6 hours
Level End Point: 2542m
Starting Point: Lago Di Braies
Descent Details: Hike tail 61 to the Forcella di Braies/ Pragser Furkel gap and then continue onwards back to Lago Di Braies.
Description: This is a short, non difficult fixed rope route. The route is in an isolated area with long rising and falling sections. Good orientation skills required.
Climbing Crag (h)
Orientation: SW
Starting Point: Lago Di Braies Car Park
Approach time to the Climbing Crags: 30min walk
Family friendly
Climbing tails near Lago Di Braies. (8) Via Ferratta trail and (H) Climbing Crag
3. Have a Picnic
With limited restaurants in the area and such a gorgeous setting, a day out in Lago Di Braies is the perfect excuse for a picnic!! As you walk around the lake, you’ll notice a few picnic tables and sandbanks perfect for setting up a picnic and enjoying the sunshine!
4. Rent a boat and row in the lake
According to legend, the only way to reach the Fanes underground realm was to sail across Lago Di Braies by boat to the base of the Croda del Becco.
In fact, up until 100 years ago, the only way to reach the lake’s Southern shores was by boat. Today, you can hire a traditional wooden row boat and relive the magical legends of the lake yourself. If hiking isn’t your thing, then this is a fantastic way to experience the beauty of the area.
Boats are available to hire from June to September from 10am – 5pm every day. They cost €15.00 for 1/2 an hour and €25.00 for 1 hour.
5. Swimming & Fishing
These are two activities I did not know you could do at Lago Di Braies, but according to the official site you can! Chill out in the sunshine and take your chances with a bit of fishing or, if you’re game enough, take a dive in the icy cold alpine water…I’d rather stick to the hiking and photography please.
6. Take Instagram worthy photos
This place is picture perfect for Instagram photos. No matter which angle, sunshine or clouds, your photos will look stunning. In fact I can only think of one thing that is likely to ruin your photos. People. A lot of them. That’s right, Lago Di Braies gets extremely crowded and is a popular destination for numerous tour buses, tourists and locals.
The crowds are said to start from 9:30am, and knowing this I set out to arrive early. I got to Lago Di Braies just after 6am which was made easy because I was literally staying in a hotel that was around 5 mins drive down the road (details below). Arriving before 7am also meant cheap parking at only 2 euro!
Surprisingly, there were still a few people in the area at this time, mostly photographers, but also those looking to enjoy an early morning walk. It was by no means crowded and I had the opportunity to take my time with photos and really enjoy it.
The only downside with arriving so early was that the Boat House was closed, so I missed out on taking some iconic photos of the boat house steps that lead down into the water and some shots from inside a boat. However if you’re able to spend a day here, arriving early leaves enough time to capture photos, hike around the lake without the crowds and be back in time to catch a boat ride when they open at 10am!
5. Visit Lago Di Braies Chapel
There’s something so beautiful about Swiss style churches – and yes I know that we are in Italy, but the churches here are of the same style as in Switzerland. This chapel was built in the first years of the 20th century and consecrated in 1904 to Our Lady of Sorrows. It now belongs to Hotel Lago Di Braies and has important ties to World War II, but I’ll let you discover those for yourself ;)
Please note that the church is only able to be visited in Summer.
When to Visit
Lago Di Braies is stunning all year round, but some seasons have a few more perks than others. Visiting in summer gives you access to the traditional row boats and the chapel, both you cannot experience outside of the summer months.
I visited on June 12th and was happy to see some snow still left on the Croda del Becco. I definitely think a touch of snow adds to the magic of the place!
FYI – In the middle of winter, the lake is often frozen over and covered in snow. Therefore you won’t be able to see the lake, the area will look completely white.
Lago Di Braies is located in the Braies valley in the South Tyrolean Dolomites in Italy.
Getting to the Dolomites Region – Closest Airports
There is no direct flight to the Dolomites region, so the closest airports in Italy are Verona, Venice Marco Polo and Venice Treviso. In Austria, the closest airports are Innsbruck, Salzburg and Klaenfurt with Munich being the closest in Germany. From here you can easily drive, catch public transport or take a guided tour to Lago Di Braies.
Closest Airports to the Dolomites/Lago Di Braies
Hire a Car
My preferred option when travelling not only because it’s comfortable, but it gives you a whole heap of freedom, it’s reliable and most importantly, it saves time. Having a car also means you can beat the crowds! If you’re travelling in peak season, you could get away without having a car because public transport is frequent and reliable, but if you’re visiting outside of peak season, I definitely recommend hiring a car.
Driving in this beautiful region was an absolutely wonderful experience. It is so stunning. I hired a car from Venice Marco Polo Airport and the drive was simple. There are tolls on this route and working out how to pay for them on the fly was slightly difficult, but I was able to figure it out in the end.
I used GoogleMaps to navigate and simply typed in “Lago Di Braies” as the destination, or you could use the map I’ve created earlier in this post and navigate to one of the parking areas instead.
Here’s how long the drive takes from various destinations:
From Venice: Just under a 3 hour drive taking the A27 and SS51
From Verona: 3 hour drive
From Innsbruck: 2 hours drive
From Brunico: 35 minutes drive taking the SS49
Public Transport
From Venice Airport, there is a direct “FlixBus” to Dobbiaco, where the central bus station in the Dolomites is located. Here you can catch a local bus 442 (purple line on map below) directly to Lago Di Braies. The total journey will take around 4.5 hours.
The 442 also passes Dobbiaco and Villabassa Stations, so if you’re coming by train, you can transfer from either to get to Lago Di Braies. Villabassa Station may be a quicker alternative if travelling by train from the Brunico direction (Verona, Innsbruck or Munich airports).
Bus 442 roughly comes every 30mins in peak season and costs 3 euro per person. Children under 6 ride free and furry friends are welcome. This site in general is great for finding your way around the Dolomites region by bus: http://www.sii.bz.it/en and also has some phone numbers you can contact if you have any problems.
If you have downloaded the timetable, here’s what the following symbols mean:
(1) Services running from 24.6 to 16.9 only
(7) Service not running on Saturday, Sunday and Public Holidays from 3.4
(S) Service running on school days only
(X) Service running on weekends only
(C) Services running from 24.12 to 2.4 only
(Half coloured square) Services run on weekdays except Saturday.
Shuttle Service
If you prefer, there is also a shuttle service from Monguelfo train station directly to the lake. This costs 3 euro pp, children under 6 ride free and furry friends are welcome.
Dolomites Bus Network Map. You can see bus 442 to Lago Di Braies is coloured in purple.Dolomite Train Timetable
LAGO DI BRAIES ACCOMODATION
I stayed at Albergo Steinerhof which I enjoyed. The inn also has it’s own restaurant where you can buy lunch or dinner. Best of all, Albergo Steinerhof is located only 5 mins drive from Lago Di Braies. My stay included free breakfast which I thought was impressive (image below). There was a selection of colds meats, cheese, bread, croissants, jams and other spreads, cereals and fruits. There was also free wifi.
The lady who runs the hotel is lovely. Although she doesn’t speak English, she tries her best to understand and communicate with you.
Photo from booking.com
GENERAL INFO
PRICE
Free entry to the Lago Di Braies
Paid carpark – Before 7am 2 euros, 7-5pm 6-8 euro, after 5pm 4 euro. Parking is located very close to the lake, refer to image below for a visual reference. The map earlier in this post provides a location reference to the parking.
OPENING HOURS
Open all year round
FACILITIES
Dogs and pets are allowed, but you must pick up after them.
Toilet facilities are available at the southern most part of the lake and inside Hotel Lago Di Braies.
Food at the site is limited, with the closest being available from Hotel Lago Di Braies. It is recommended to bring your own food, or you can find a restaurant in a nearby town.
Lago Di Braies is stroller and disabled friendly when accessed via the carpark. Hiking around the lake is not possible with strollers or people with limited walking ability as there are many steps and steep areas.
Hotel Lago Di Braies, shot from one of the parking areas. You can see a parking sign to the right of this photo.
What’s the most beautiful lake you’ve visited?
If you have any questions feel free to ask in the comments below!
Run by two travel and lifestyle bloggers, The Hidden Thimble focus’ on creating truthful and in-depth travel guides, food & beauty reviews. Enjoy drool-worthy photography from around the world!